Girl Scout Memory Frame

In May of 2021 I decided to do a project with some of my Girl Scout Memorabilia from the 1960’s. I already had the shadow box frame I had picked up over 10 years ago to use for this. My husband made a new board for the back piece but everything else was in good shape. I am at a point in my life where if I don’t find a way to display the stuff from my childhood then I need to get rid of it. We are fortunate to have a country style restaurant with vintage items and antiques all over for decorations so we can easily display it there.

My Junior Girl Scout Uniform with sash, pins, & badges from the 60’s
I laid out everything and pieced together what would work in the frame. I used velcro to fasten the items. But if I were to do it over again I would put some glue or staples at the top to keep it from sagging over time.
Some of the items in the display case include: A girl scout songbook, a vintage copy of the G. S. Laws & Promise, my orange slide tie with brass tips, a Girl Scout cookie banner, A Be Prepared Patch (our motto), A Camp Marydale Patch from when I went to summer camp in 1967, a vintage Marydale postcard, a Girl Scout Lives Here Magnet & envelope with Vintage Girl Scout stamps, membership stars, my troop number 68, World Association Pin and Girl Scout pin. The only piece not part of my uniform is the green tie in the left hand corner – It belonged to my sister in the 50’s.
Here it is on the wall displayed at our restaurant, “Country Kitchen”. On the shelf next to it is my flashlight from the 60’s and a vintage canteen like the one I had. I have had some customers, especially previous girl scouts, who have enjoyed looking at the blast from the past. Brings back lots of fond Girl Scout memories.
Here is my Senior Girl Scout uniform with hat and belt. I put it in my shop for sale. I have a hard time parting with stuff but I’m in that mode now. It’s about time!
Advertisement

1939 Vanity dresser brought back to life

A long time friend of mine asked me if I would like to take on the job of redoing a dresser that was hers, when she was a little girl, for her granddaughter. I don’t tackle big pieces of furniture too much these days but how could I pass up transforming this wonderful, solid piece of furniture; especially for a friend and her family.

The history of the dresser: My friend’s parents got this dresser the year they were married in 1939. She remembers growing up with this dresser in her room. Her fondest memory is of mornings sitting on the vanity stool while her mother fixed her hair into a ponytail. She will put a framed picture of her on the dresser for her granddaughter to preserve this special memory.

The dresser was pulled out of a storage shed where it had been for 20 years awaiting its revival. It needed to be fixed in some areas but overall in good shape for an 82 year old piece of furniture.

The first part I did was the drawers and knobs since I could do this part at home on my dining room table. Everything had to be cleaned and sanded to get off some of the antiquing and residue from being in storage. We didn’t want the green color to show through so I decided the best thing to do was put on a white primer for the 1st coat. The choice for the top color was Hazel 6471 – Sherwin Williams. I made my own chalk paint using this color. I’m so glad the original knobs were all in great shape and love the way they came out when distressed. (I’ll explain later on how I got mostly white to show through when I distressed)
The top picture shows how we had to glue some of the veneer on the drawer facing that was coming loose. The bottom pics show the painting of the inside of the drawers to make them fresh for a little girls room. This ended up being one of the biggest challenges. The stain from the wood leaked through even though I used primer and many coats of white chalk paint. Then I had some issues with varnish yellowing so had to repaint them again. With so many drawers you can imagine how I wasn’t happy with this situation but I kept on trying till I got it right.
Finally got the drawers nice and white.
Next I redid the vanity stool which was original to the dresser. My friend did the upholstery for the seat and picked a beautiful fabric. (see final pic at end of post)
This shows some of the process of the cleaning, sanding, and painting. Love the details and grooves on this dresser!
I did not sand down completely to the original wood as you can see. I wanted to make it smooth for painting and get the antiquing off as much as I could. I had to vacuum the dust as I did it and I doubled up on the face mask to keep from breathing in the residue.
After painting the furniture in primer, the next day I put a thin coat of Annie Sloan clear wax on the parts I wanted to distress ( edges, curves, etc.) This enables the white to show through after you put the top coat on and you lightly distress. It’s ok if a little of the original wood comes through but for the most part we wanted it to be light colors for a girl’s room, not dark and too distressed.
The lower part of the inside area where the stool would go had some chipped and rough areas that needed to be fixed. My husband who is very good at fixing furniture areas, glued a strip of wood across that part on both sides.
The last part I worked on was the mirror. I was thinking it might have bad spots like most mirrors of this age do. Surprisingly with a good cleaning it was nearly perfect! My handy husband clamped the posts that hold up the mirror on his vice so that I could paint them. He always comes up with great ideas.
The last step was to put a few coats of varnish on the top of the vanity dresser with General Finishes High Performance satin. All the other parts were waxed with Annie Sloan clear wax. I was so happy to get it done and bring back to life a piece of history to a precious family.
Here it is in its new home – just right for a special little 4 year old girl to spend many years at just like her grandma!

Hand Crafted Angels by Ginger

IMG_0348

This was my very first angel I created in 2017.

In 2017 I decided it was time to clean out a lot of my craft items and hoarded objects. I had collected a few boxes of vintage jewelry over the years and it was time to get rid of it or use it for something. I had a few of those angel pins that people wore back in the 80’s. As I was trying to decide what to do with them the idea popped up in my head that maybe I could put together objects such as jewelry and make angels.  The picture above was my first one.  I showed the angels to my sister in law and she wanted to buy them. So that’s how it all started. This all happened around the time of our first craft market at our church which got me to thinking how much I’ve always wanted to do a booth with crafts.   So right then I decided I would make angels and other crafts and save them for the following year’s market. 

IMG_4811

This was in 2018 at the Holly Jolly Market. I went a little crazy but I did use up a lot of my craft supplies and had so much fun doing my first market.

IMG_1956

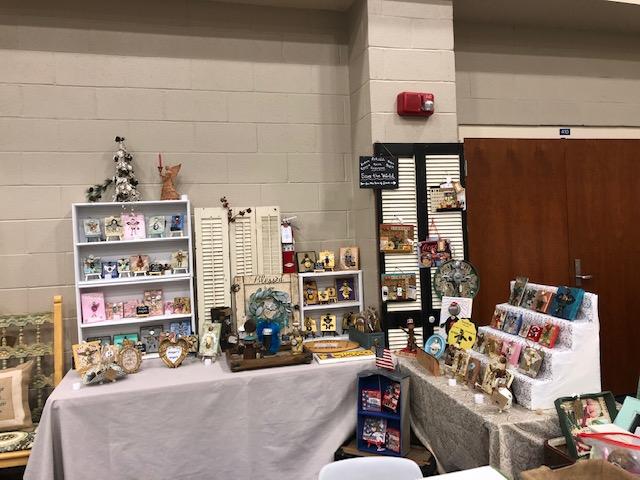
This was at the 2019 Holly Jolly Market.

lockplate angel collage

The angels put on vintage door lock plates are the most popular. (The lock plates are hard to find & sometimes pricey)  I get lucky every now & then.

Compass enjoy the journey Collage

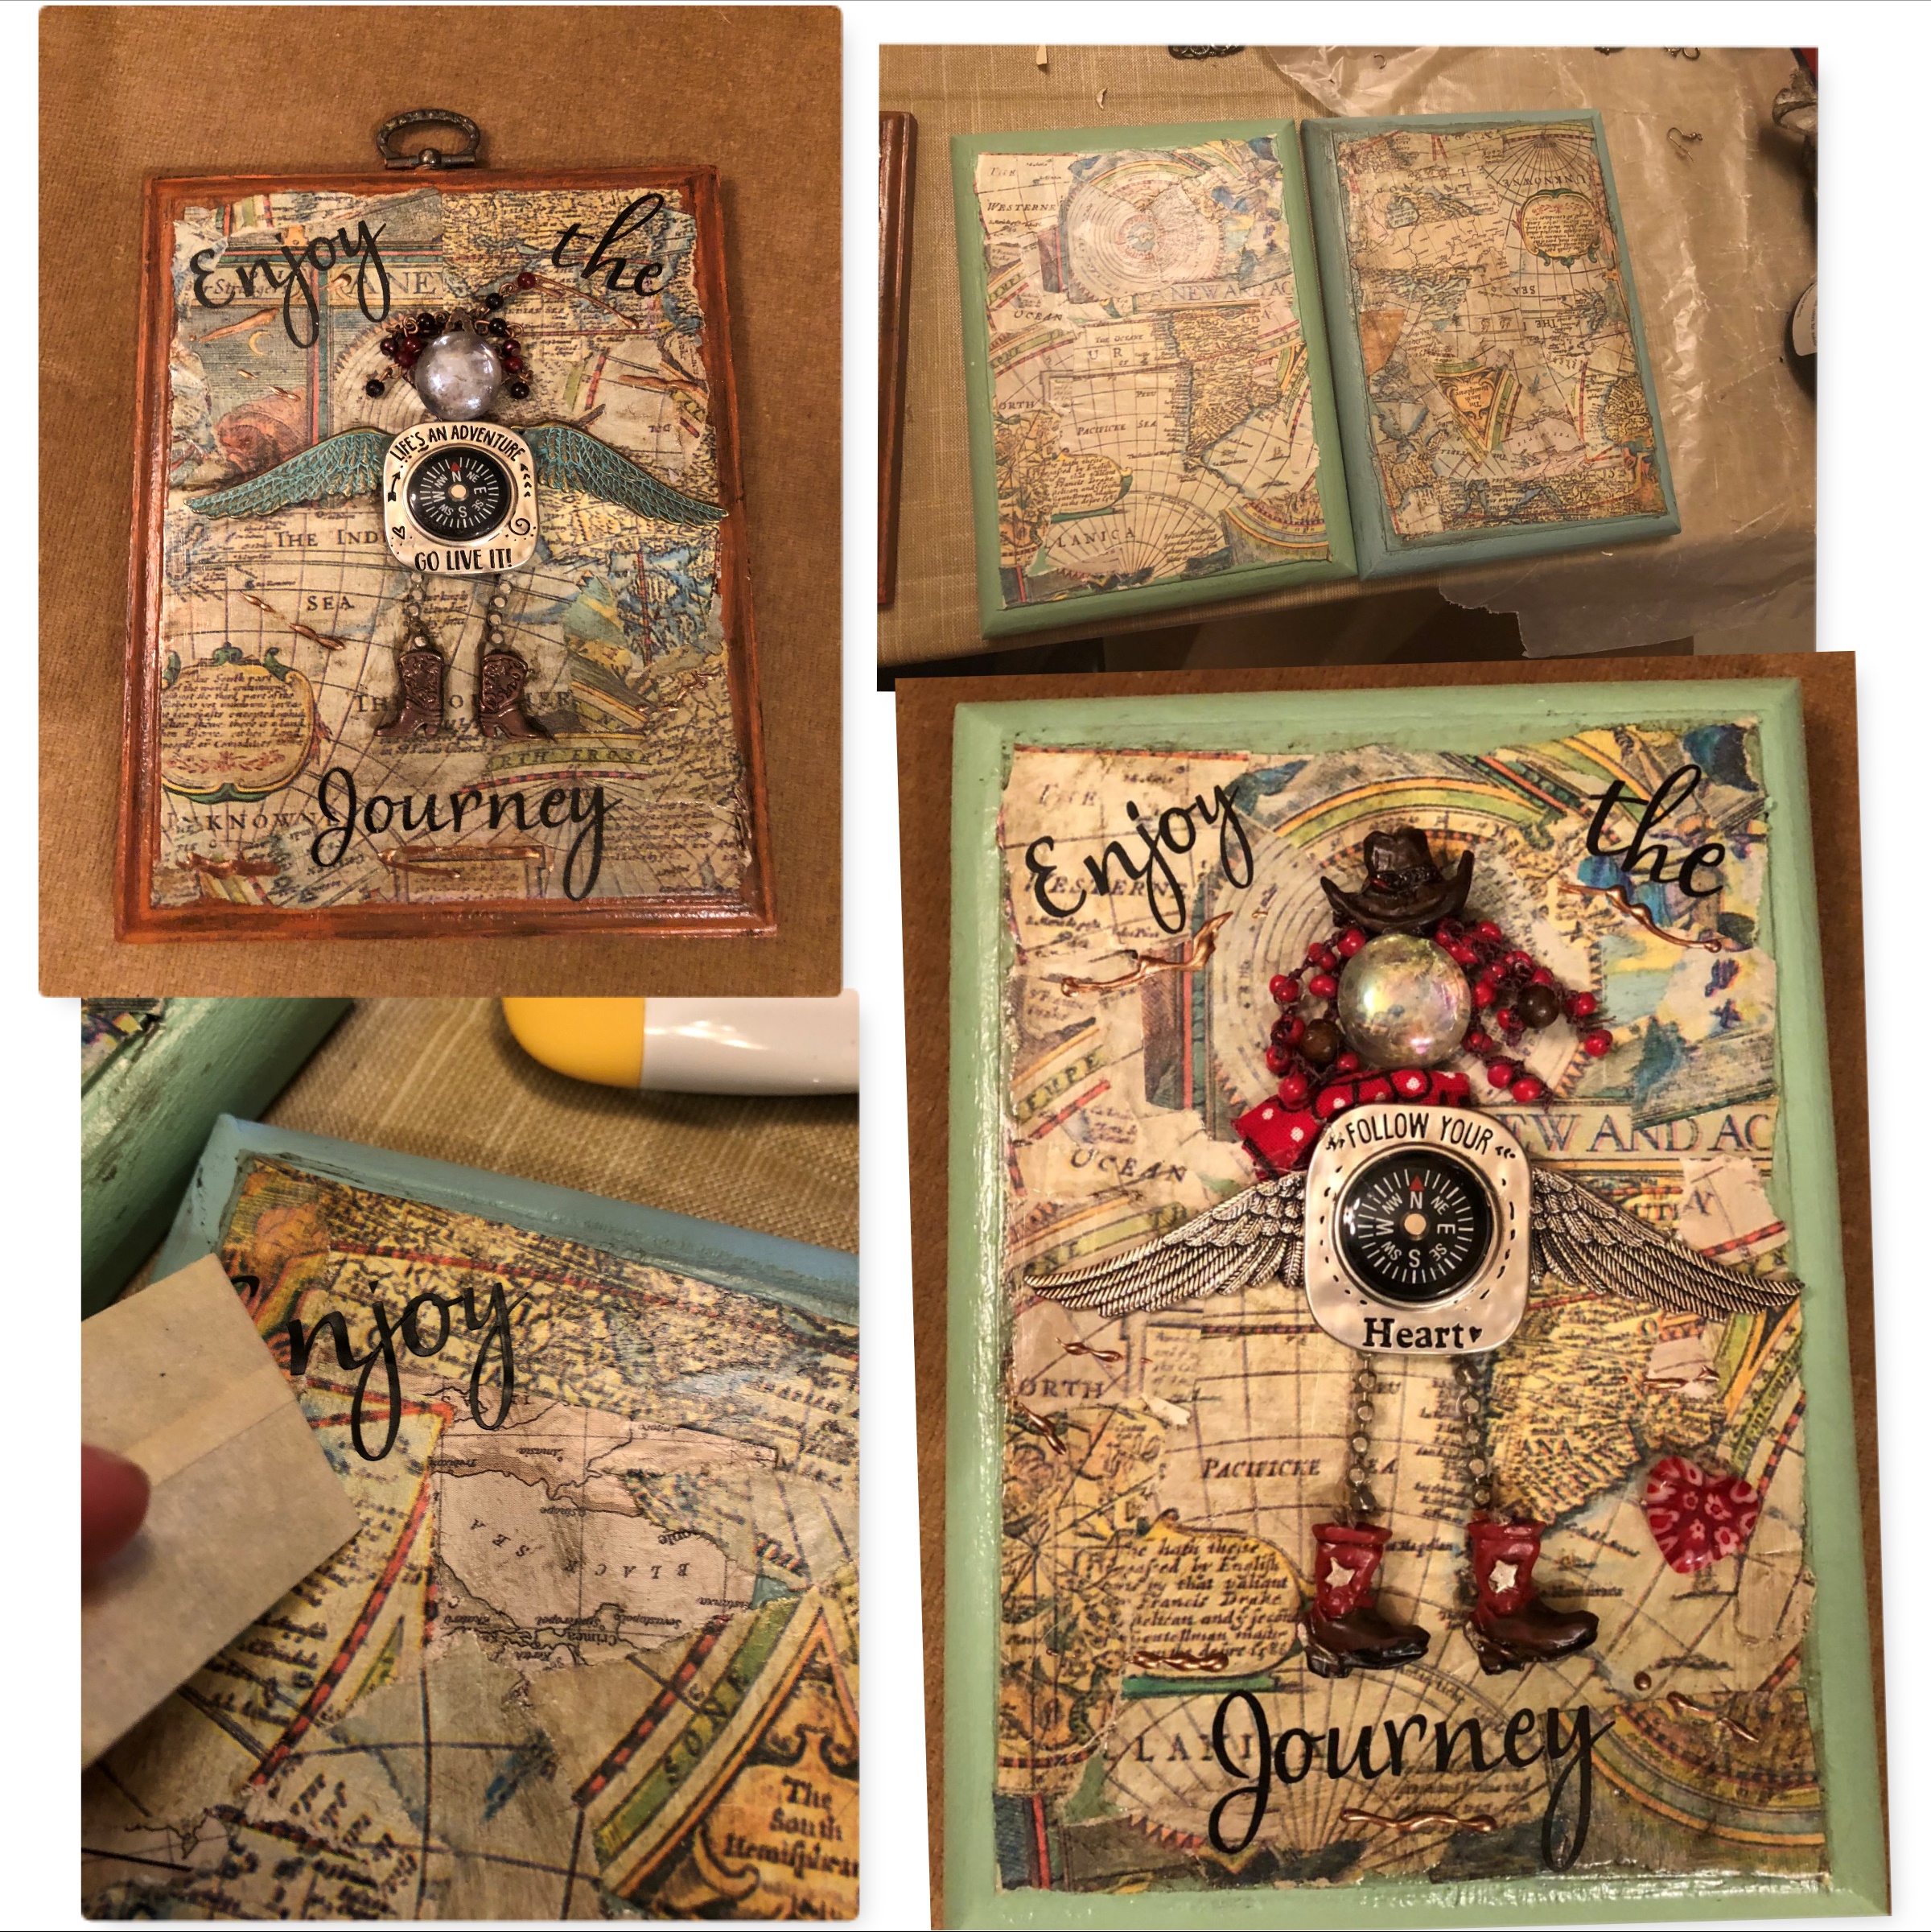
These are ones made on wooden plaques.  I like to decoupage a background on many of my angel plaques. These angels had compasses so I put maps and added “Enjoy the Journey” with cricut vinyl lettering.

Beadboard Collage

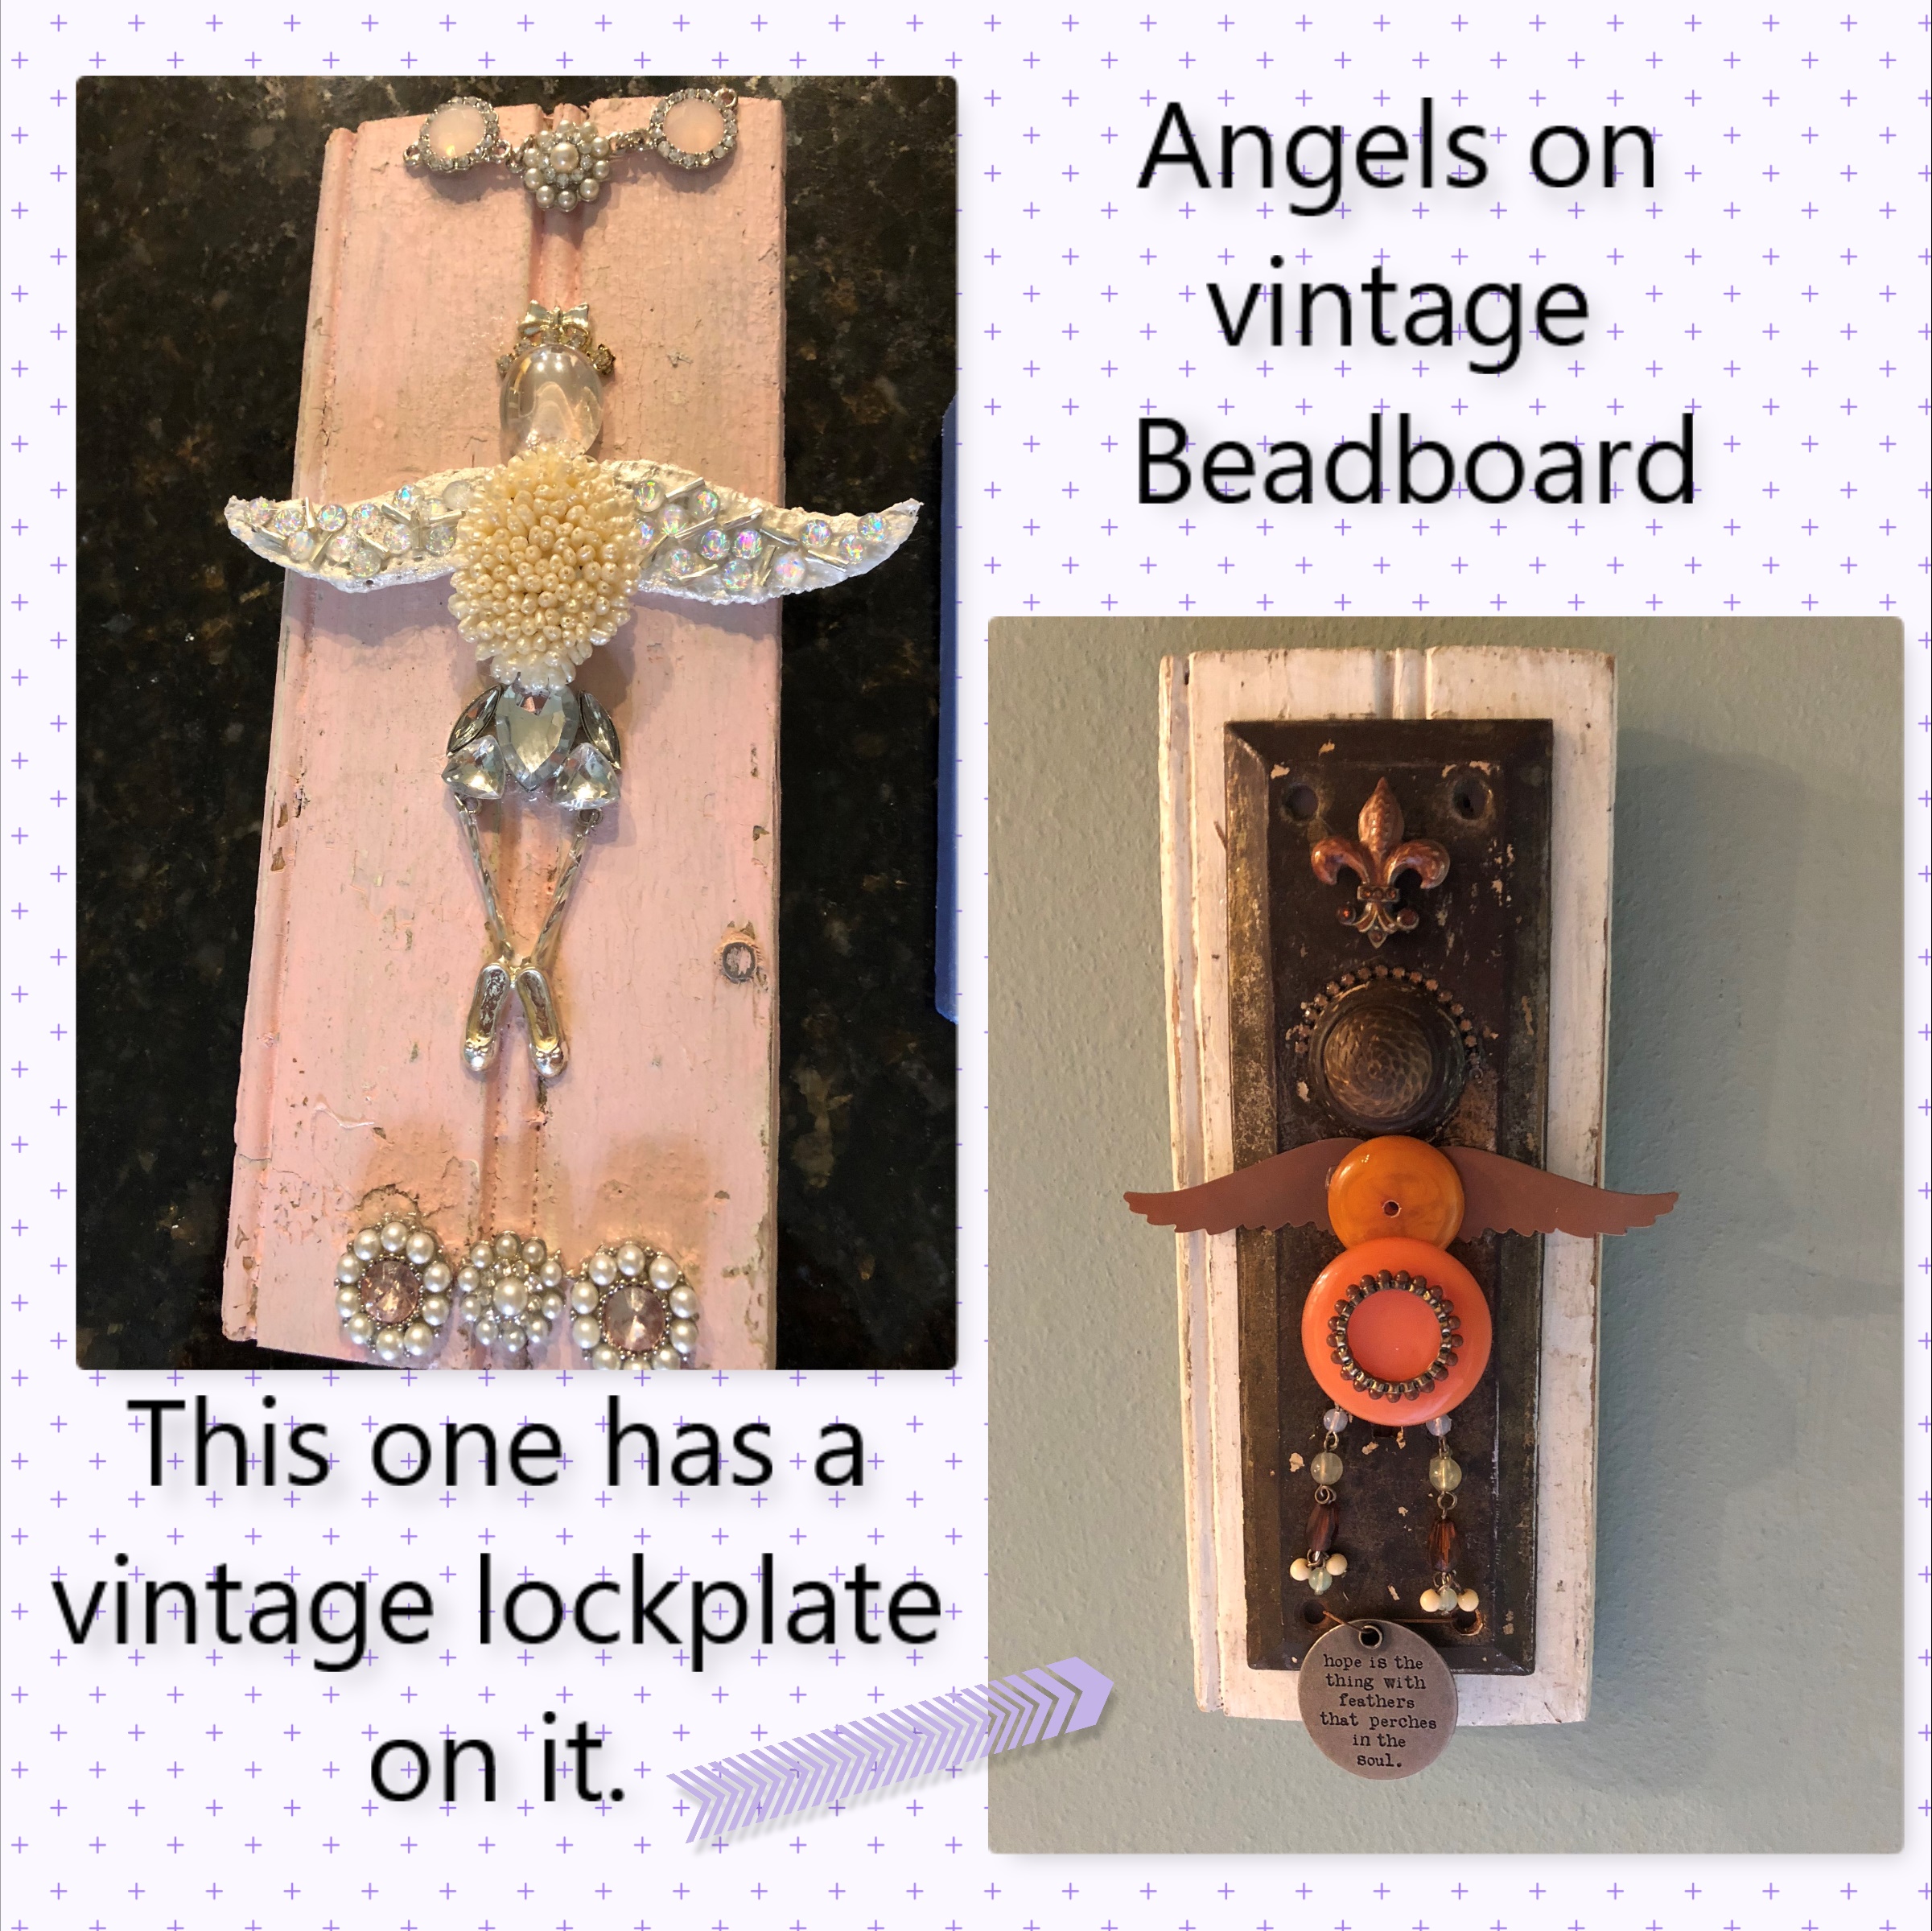
The pink bead board has a ballerina angel. The wings are handmade with plaster wrap and then decorated with  jewels. The one that looks like a bird has the saying, “Hope is the thing with feathers that perches in the soul.” The body is made with vintage bakelite.  I kept this one and have it hanging in my bathroom.

watch heads Collage

These are made on canvas and all have heads made with watches. The one on the bottom left was made for my sister and I used her watch to make it. I always like it when I can use something personal on my creation for the person it goes to. I recently made one for our nephew’s wife after we attended their wedding at the beach. I used shells found at the wedding and a Costa Rica charm and put a map of important places that had to do with their relationship as the background. We gave it to her for Christmas.

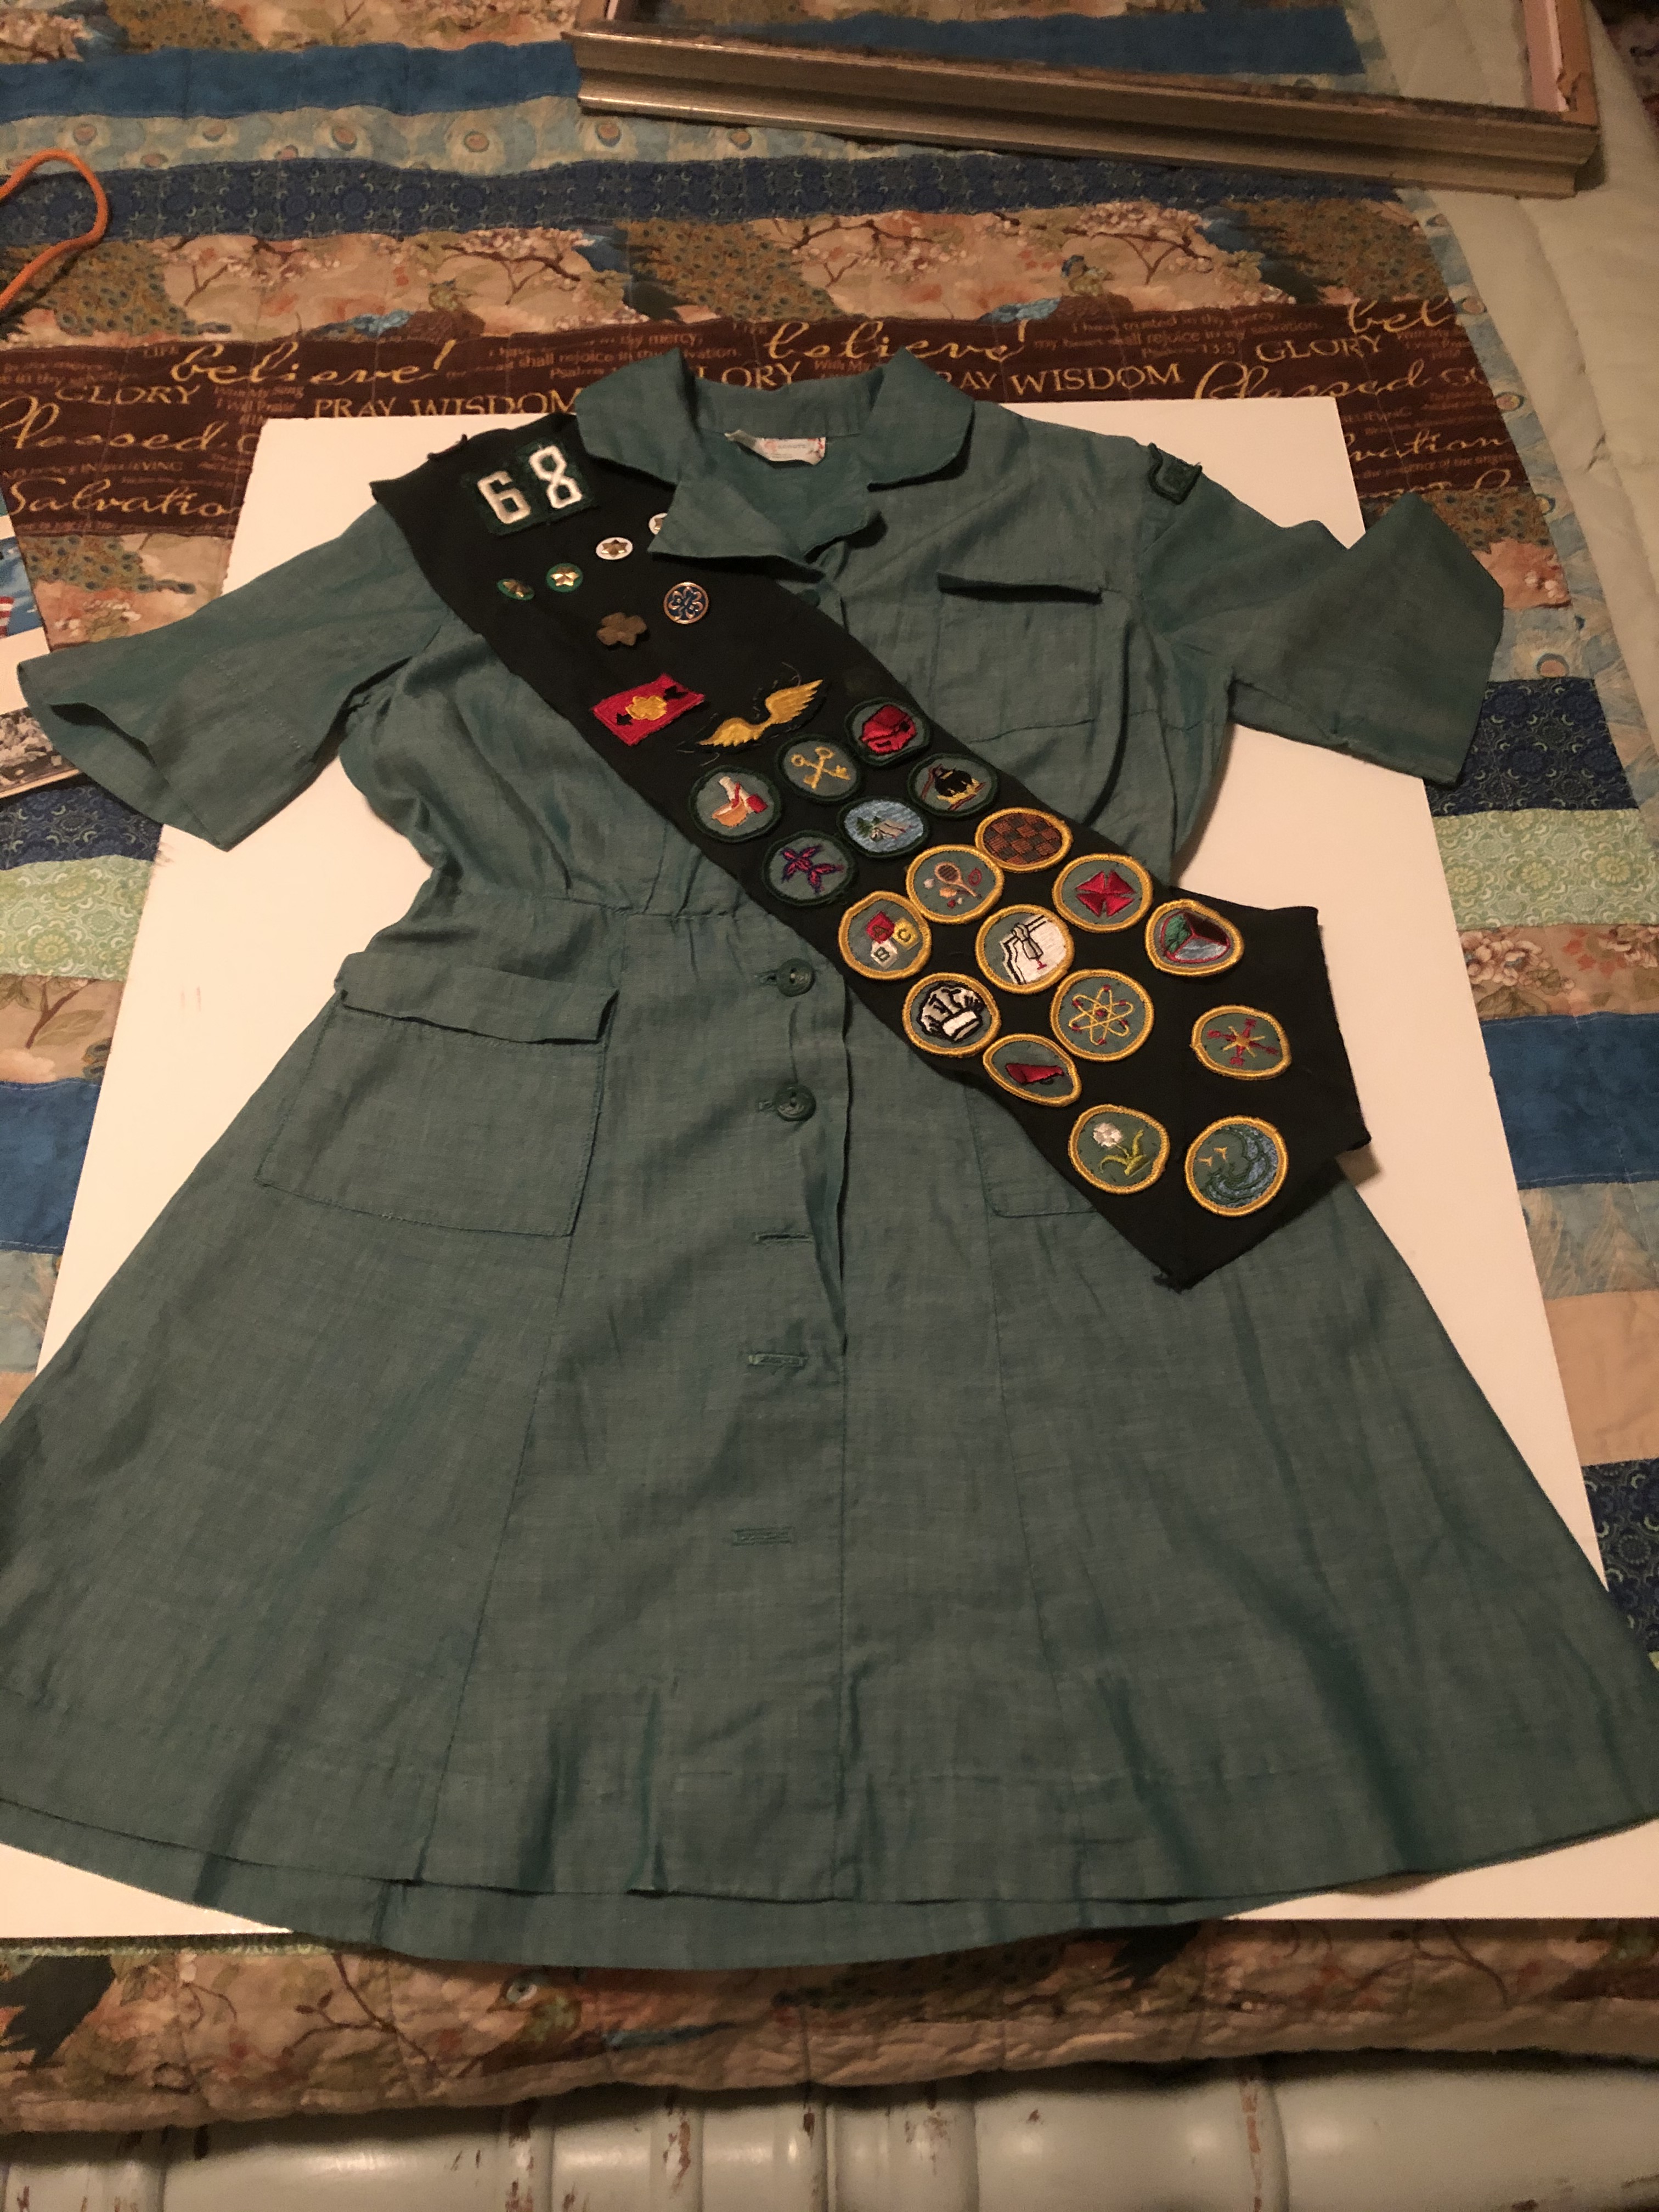
This shows a variety of angels. As you can see there are endless ways of making them. Sometimes I have a theme such as the Girl Scout one. I was able to use some of my memorabilia from my Girl Scout days. Two of these (top left and bottom right) were gifts for my sister in laws after our trip to Venice. Pieces of Murano glass were used for the center. The angel on the bottom left has homemade wings made with modeling compound in a rubber mold.  Some wings are homemade, some are purchased from a craft store, and some are made with objects or jewelry that look like wings. Some of the angels have parts that move such as beaded hair or shimmering gold pieces such as on the angel to the bottom left. Some have hair, halos, crowns, or hats. Each one is unique!

IMG_1884

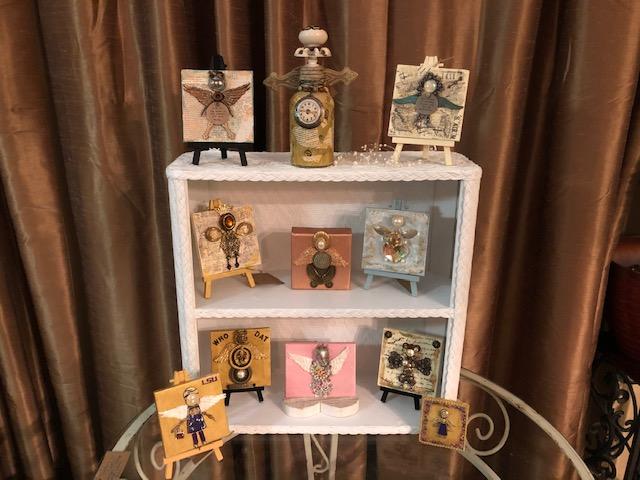
Another collection of Angels

I love making angels out of old rusty hardware, springs, screws, keys,whatever I can find that can be put together on a plaque. The one on the left a friend bought for her camp. (I added the name of the camp on it and added the fish) The center part is an old door plate. The one on the right is on an old rusty tray.

I always put a handmade tag with my angels that have a saying on it that goes with the angel.  Sometimes I have a saying or Bible verse on the actual plaque or as part of the angel on a charm. I want my angels to brighten someone’s day or give a person hope. Many of my angels have gone to people who are experiencing hard times such as going through chemo or grieving over a lost loved one. I feel like the creations are inspired by God.  I also feel like my dad is looking down on me and smiling from heaven. He was a self made artist and he created figurines out of balsa wood or modeling clay.  He knew so well how to do the features on people and the body proportions. I certainly can’t carve like he did but I’ve always had the desire to make 3 dimensional art and mixed media art in some way. I was always drawn to collages made with old things.  I love making them as gifts for people and to sell at the market & my shop.  It  is at least a 3 or 4 day process & I  do about 8 at a time. It takes a lot of work with many rooms of my house taken over with craft stuff but thankfully my husband is patient with the mess and he even helps at times with the process of making wooden plaques or using his tools to take jewels apart or make something a different shape. At this point in my life this is a great craft to do because it helps keep my mind active, it does involve a lot of movement because I have to get up and look through many containers, boxes, bags, etc. to find just the right piece I need and it’s fun which of course helps relieve stress. 

Sorry about this post being so long but wanted to share about my angel making and how it all came about.  I’ve been wanting to post about this for 2 years now and it took a quarantine to give me the incentive to get it done.  I would love to hear feedback/ comments. Let me know if you’ve ever created something with jewelry. 

Cypress frame for floor length mirror

I mentioned to my husband that I needed a floor length mirror to put in the bedroom. The cheap rectangle (door type mirror) that we used to have broke. He said he thought he could make me one. So we looked up some pictures of floor mirrors to figure out the measurements. Then he went to his workshop to see what kind of wood he had.

IMG_7789

He had this beautiful and unusually shaped piece of cypress from his brother’s land in Mississippi.  It was hard for me to envision how this would work but I knew he had a plan and could do it.

IMG_7791

He cut it into two pieces and cut off some of the end pieces to make the frame on each side of the mirror.

IMG_7885

He used a piece of cedar for the top and bottom part of the frame.

New Phototastic Collage

We purchased the mirror for around $50 from a local glass store. He attached a piece of wood to the back with a hinge to make it a standing easel type mirror.

IMG_7927

Here is the finished mirror in our master bedroom. It came out beautiful.


Bench made from Bed frame

IMG_4470

Finished Project – Bench made from Bed frame

My husband loves to make these benches out of a Headboard and Footboard. This one has such a nice design on the back and the blue color worked so well with it.  I haven’t done one in blue before and wasn’t sure I would like it.

IMG_4419

This is the beginning of constructing it. He cut the footboard in half to use for the sides.

IMG_4441

The bench seat was made out of plywood. 

staining Collage

I stained the new wood with a dark stain. It didn’t matter if it matched the other wood since I’m painting it.  We filled in gaps and holes from screws with putty.

New Phototastic Collage

I bought the cushions from Lowe’s. I painted the first coat green which did go with the cushions but I just didn’t like that for the final color.

waxing and painting instructions Collage

I put a light coat of the CeCe Caldwell’s clear wax, let it soak in and dry some and then painted the blue chalk paint.  Then I distressed it lightly with 150 grit sandpaper and then went over it with a fine sandpaper block to smooth it out. Then I put a few coats of varnish to seal it.

IMG_4468

I had it on my patio for a day or two and now it is for sale in my shop.  $250 (includes long pillow and cushions)


Holly Jolly Market at my Church

IMG_4811

Last year I participated in a market at my church in November. So last year’s goal was to get to some of those projects that I had been putting off and to clean out some of my craft stuff and hoarded items. Well I did just that! But I spent so much time making things that I didn’t take the time to do any posts on my website. So I just wanted to let people know why there were no post or current pictures added.  I was still doing lots of projects. Every now and then I would post pics on facebook but I took a break from the blogging and the use of my website. I’m now trying to get back into it so you’ll see many blogs in the next couple of weeks about what I’ve been up to.  My booth was a success at the market (my 1st time to do this) and I will be doing it again this November but won’t showcase as much. I had way too much stuff and that’s too much work to set up and break down. I have a shop at my restaurant so there is no need for me to go that overboard. The handcrafted angels on plaques are what sold the most so that will be what I will concentrate on. I will do a blog about my handcrafted angels soon. So keep checking in to see what’s happening with “Ginger’s Attic”.

Secretary Cabinet painted & distressed

IMG_0774

The finished Secretary/ cabinet.

IMG_0775

My daughter loves all the drawers for storing small household items and labeled each drawer using a chalk marker.  The back of each door is painted with chalk paint and can be used for memos.

IMG_5560

This pic shows the starting of the refurbishing. (Somehow missed getting the before pic)

This Secretary/ Cabinet belonged to my in-laws many years ago and had been kept in a garage for the last few years. It was not in good shape and very musty. I had to spend a good deal of time cleaning it and knew I would have to do some kind of stenciling to cover up the damaged places on the front of the cabinet doors.  My husband had to put a new frame around each cabinet door.

stenciling Collage

 I wanted it to look like a screen type pattern. It was not an easy task and it took a lot of detail work.  I had to hand paint some of the parts close to the edge.

drawer collage

This piece had a lot of drawers. I cleaned each one and painted both the drawers and the shelves that hold the drawers to freshen it up. I also lined each drawer with a piece of decorative felt.

IMG_6027

This was on Christmas Day when we gave it to our daughter and son in law.

1940’s Barbershop Scene

set up 2 (2)
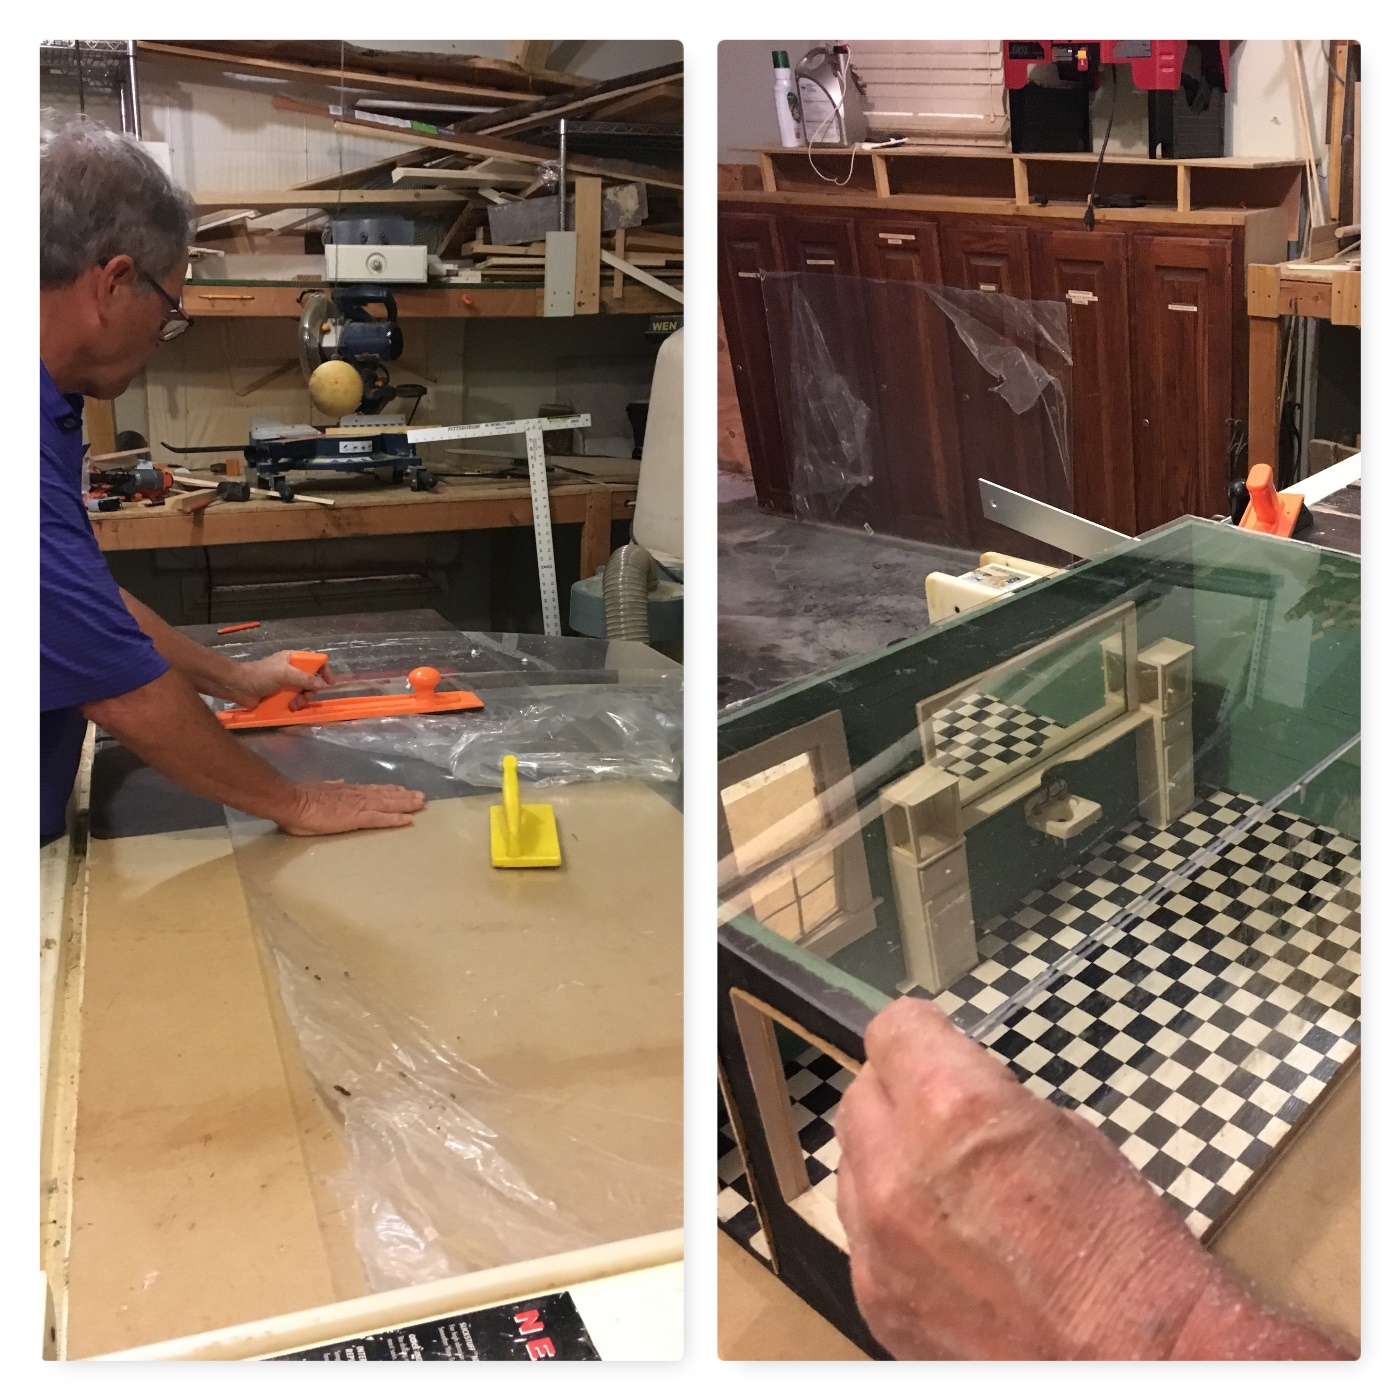
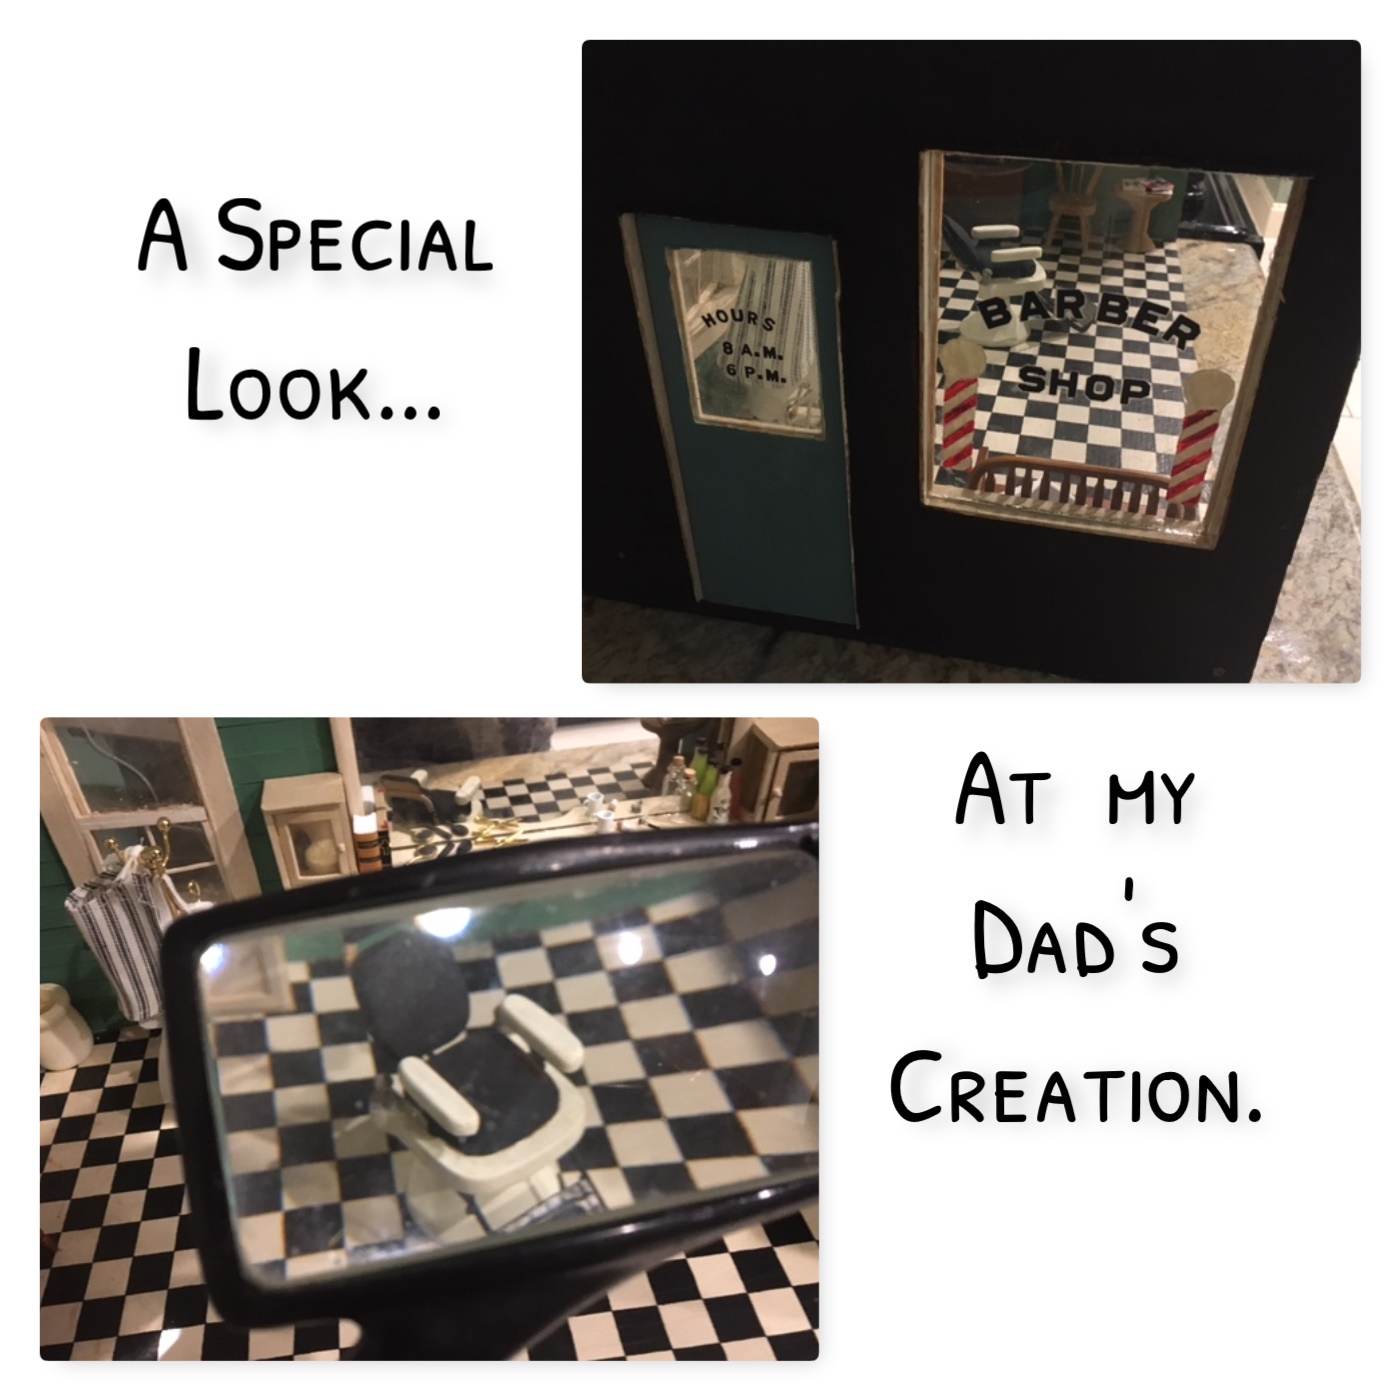
This Barbershop scene was started by my dad, Bennie Day, around 1955 before I was born. Recently I got it out of storage and decided I would finish it in honor of my dad. Bennie was a wood carver and loved making scenes that represented Americana. He completed a football exhibit with over 100 figurines that featured a Sugar Bowl game in 1950 with LSU and Oklahoma, a Western Saloon scene, and an old time Country Store.  He  didn’t complete the Barbershop scene – life with 5 children and a full time job made it difficult to get to his hobby of woodcarving. I tried  to make it look like a 1940’s Barbershop by doing some research on the internet. If my dad had completed it everything in it would have been hand crafted including the figurines of people that would have been there. Unfortunately I couldn’t do that but did get my siblings involved and we all handcrafted something for it. (some items will be added later)

collage of barber shopThis is what it looked like at the beginning of the project. He had the walls already painted green, the checkered floor painted, the cabinets, shelf, and sink were done. The barber chair was handcrafted by him but not put together yet and was in about 15 pieces. So that was the biggest challenge – to figure out how they all went together. He ended up having all the pieces to it done except one – the part to connect the leg rest to the bottom of the chair. Thankfully my husband was able to attach a piece of wood for that part. The chair has a base with a small rod and it actually swivels. The window and door had been completed back in 1955 also, they just weren’t glued in yet. I love the sign he painted on the window along with the lettering that he so carefully placed on both the door and the window.


barber chair

views of barber chair

little items & furniture
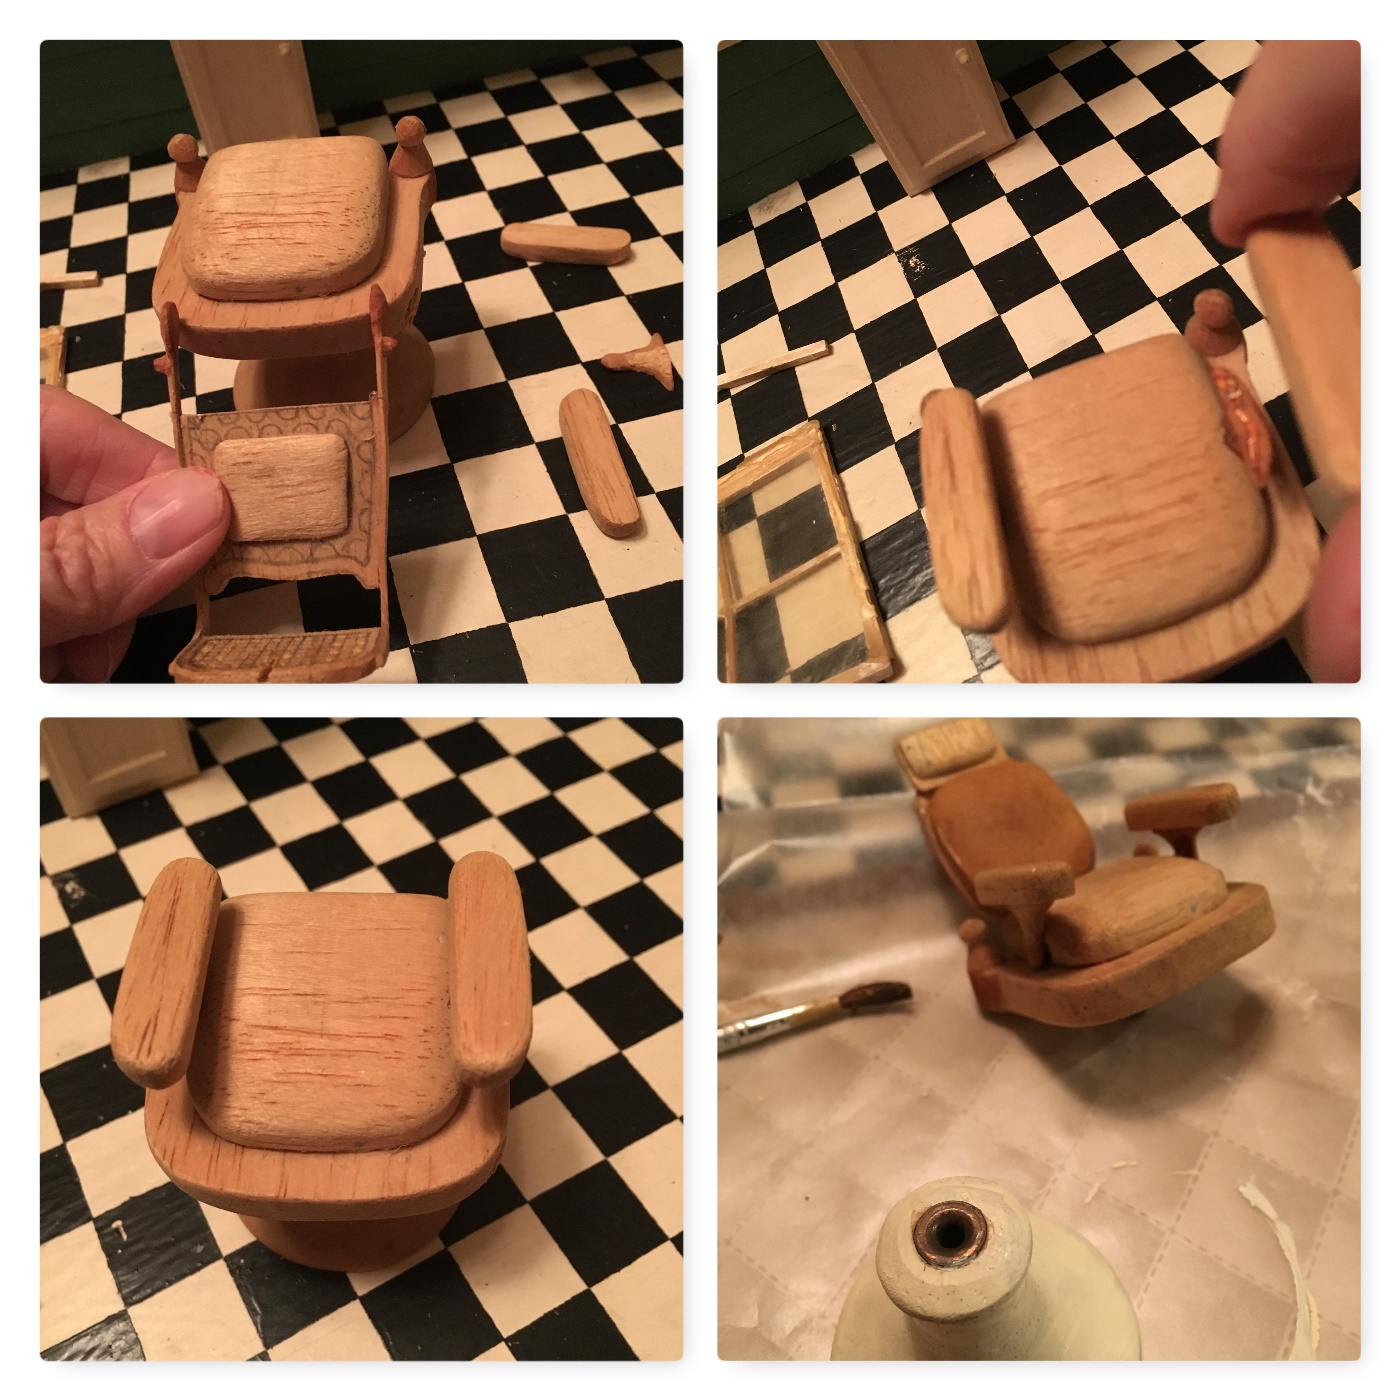
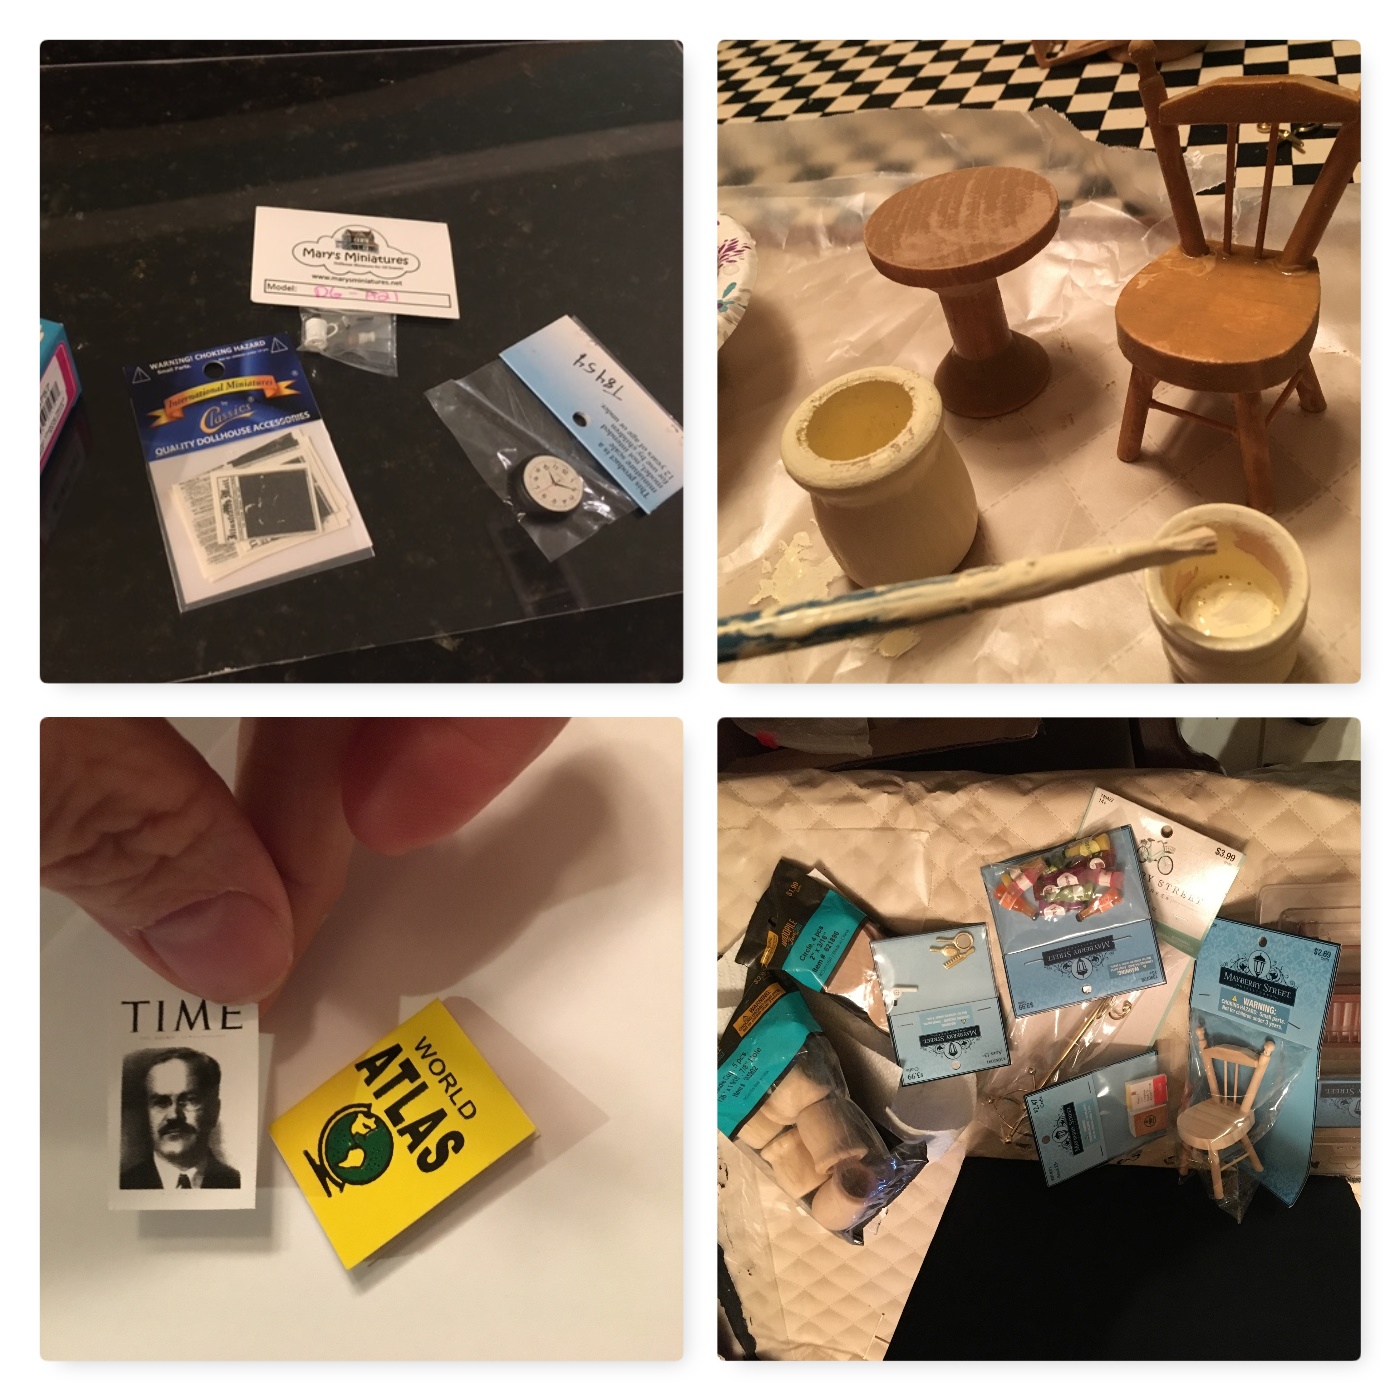
I bought miniature objects to put in the scene from Hobby Lobby, Michael’s, and ordered some from “Mary’s Miniatures” online. Some items I had to change or paint but most came ready to use. My favorite items were the shaving kit with a mug, brush, and razor. My sister and I made the aprons & capes. We have some other items that will come soon from my siblings who live away.

gluing process

It was hard for me to finally settle on where everything would go on a permanent basis. I used  regular elmer’s glue which would be easier to remove if I have to later.

making plexiglass cover

My husband made the covering for it out of plexiglass.  He attached it with screws so that it can be taken apart when needed to add items or to fix anything.

finished collage

A special look at...

These are my 2 favorite pics. I love looking through the window and thinking about what it would have been like in the 40’s and the characters that would have been there. I’m sure my dad was thinking of the story of his sister and brother in law running off to get married in the small town of Hahnville, LA. in 1942. World War II was going on and they wanted to get married before he was called off to war. The Justice of the Peace was also the town barber so they got married in the barbershop. He pulled the Bible from under the slot machine and that is why I made sure a bible was placed in this scene – to commemorate this story. The 2nd pic is looking through my dad’s magnifying glass at the barber chair that he created so long ago. I felt as though my dad was looking down on me during this whole process of bringing back to life something that he had a vision for. I think he would be happy with the way it turned out.


Sandra and I (2)
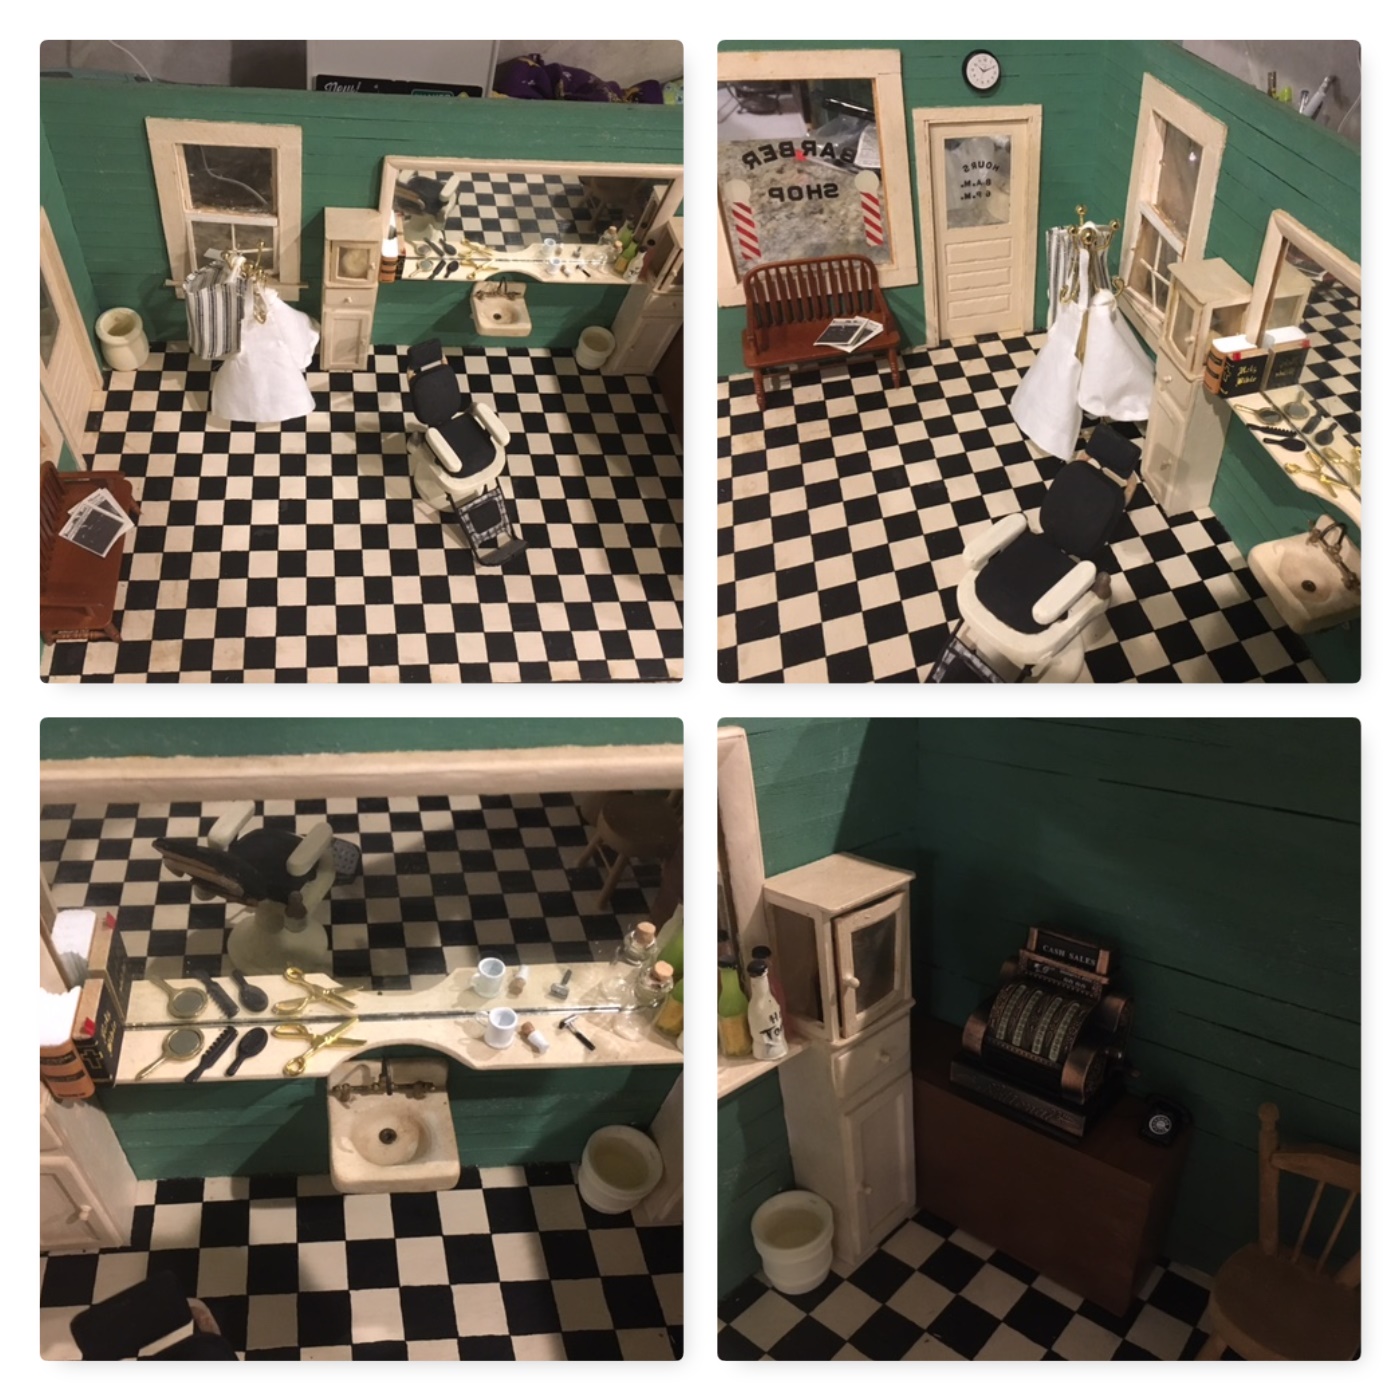
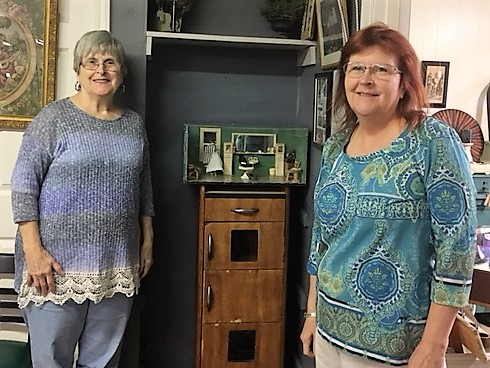
The Barbershop Scene is now on display at our restaurant. We happened to have an old Barbershop cabinet that we used for storage and that works well to display it on. This is my sister and I on the day it was put out. We love sharing our dad’s work and are so proud of him.


GINGERSCOMPUTER - IMG_4425 (2)
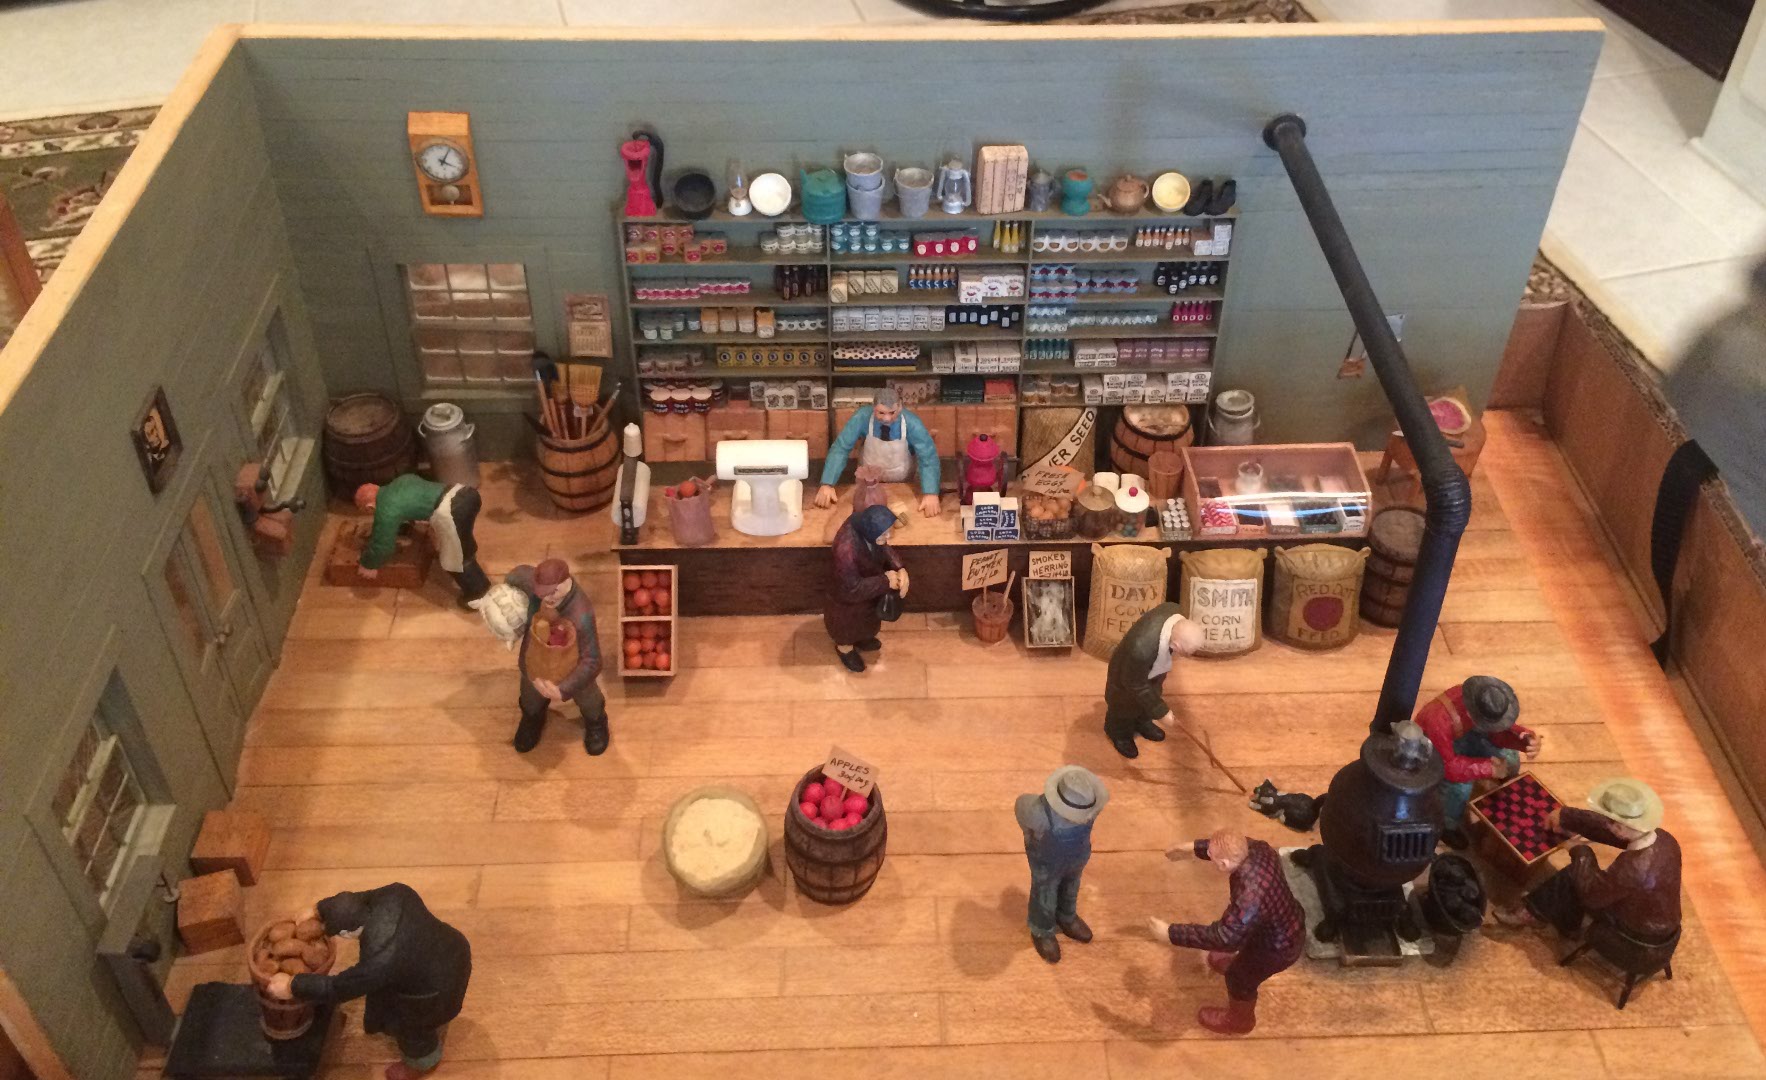
Here is a picture of one of his other scenes – the Country Store. This shows what a wonderful carver he was and how he captured the scene so beautifully.  Bennie never worked from pictures, but preferred carving from a memory of what the scene should be like.


French Povincial Nightstand

IMG_6706

I found this French Provincial nightstand while antiquing in North Louisiana. It brings back memories of my childhood since I had a large set of this type bedroom furniture in my teenage years and I saved it for my children to use for a while.  The top of the nightstand has the melamine surface so I left that alone since it was in good shape. I painted the rest of it with a white/primer paint.  Then I painted the front of the drawers with Sherwin Williams Drizzle made into chalk paint. I painted one area above each drawer with some enamel gold paint. I distressed lightly some of the areas where the original gold was. I love the way the gold looks with the Drizzle color. I put CeCe Caldwell’s clear wax on everything but the top. I replaced the beautiful original hardware on the drawers. My husband replaced the gliders to the drawers since the original ones were messed up. I purchased a drawer track guide kit at a hardware store.

image1

This shows the painting and distressing process.

image2

This shows putting the drawer lining in. I already had this beautiful wallpaper type paper that my daughter had given me. It is smooth and durable and can be wiped clean. I usually paint the inside of drawers but I think this works really well to give it that vintage look.

IMG_6704

Here is a close up of the finished nightstand. I will put it in my shop today and I don’t think it will be there for long.

Vinyl Chair Painted & Stenciled

I love working with vinyl furniture! It is so easy to paint. I used Sherwin Williams Drizzle made into chalk paint. I used Sherwin Williams Dover White for the chair legs and for the white flower stenciling.

New Phototastic Collage

IMG_5817

My inspiration- The flower stencil and the pillow. I knew the seat would be perfect for this stencil and the color Drizzle matched so well with it.

painting collage

stenciling and varnishing

It was my 1st time to use a foam pouncer by Martha Stewart. I really liked the way it went on smooth and was easy to clean. The flowers did not all look perfect but that’s ok. I put 2 coats of Polycrylic to seal the vinyl part of the chair. I painted the wood parts of the chair 3 coats, decided not to distress it and used CeCe Caldwell’s clear wax to seal.

IMG_5870

Here it is in my shop. I think this would be a fun accent chair. I’m not sure how well painted vinyl will hold up if the chair is used a lot and probably not animal or kid proof. I think a good name for this chair is “Grandmother’s Doilies”. The flowers remind me of lacy doilies.