Custom painted pieces for a friend’s vacation home

img_2749

My friend asked me to paint some furniture pieces that she owned for her family’s vacation home they just purchased.  I don’t do custom pieces too often but I decided to take on the projects.   It was a challenge with the pieces being so massive but somehow it all got done within 2 weeks.   She picked out the colors for all of the furniture and sent me pics of the bedspreads that would be used on both beds.

The first piece I worked on was a King size headboard and footboard. I painted it Sherwin Williams Drizzle made into chalk paint. Then I distressed it, then sealed it with clear and dark wax.  We decided to leave the metal lattice the way it was. I love the designs on the sides of the headboard and how they came to life when distressed and waxed.

painting-and-waxing-headboardwaxing-designs-on-headboard

img_2826

The after picture of the King size headboard

before and after of the footboard

before and after of the footboard

The footboard was so thick and solid it could stand up on its own. This made it easier to paint because I didn’t have to lean it on anything.


img_2837The next piece was a dresser that my friend wanted to match to the bed even though they originally didn’t go together.  I first planned to paint the entire dresser but as I examined the wood I didn’t want to cover it all. The top was in great condition and had such a shiny varnished surface.  I knew it would be better to leave it alone. The parts of the dresser that framed the drawers were also left with the original wood .  I experimented with leaving the middle panel of wood on each drawer and the cabinet with the original wood but ended up painting that later.  I kept on the original hardware & added some rub on bronze to help them tie in with the bronze accents on the metal lattice on the headboard.

This was what it looked like when I experimented with leaving some wood on the drawers. It was interesting but not what the client had in mind.

This was what it looked like when I experimented with leaving some wood on the drawers. It was interesting but not what the client had in mind.

img_2898_collage-before-afterimg_2901_collage-before-after    Next I painted a matching nightstand and mirror.img_6492_jpg

Here is the picture of the complete set in her vacation condo. I think the colors she picked really work well with the bedspread.


img_2902_collage-before-and-after

img_6495_jpg
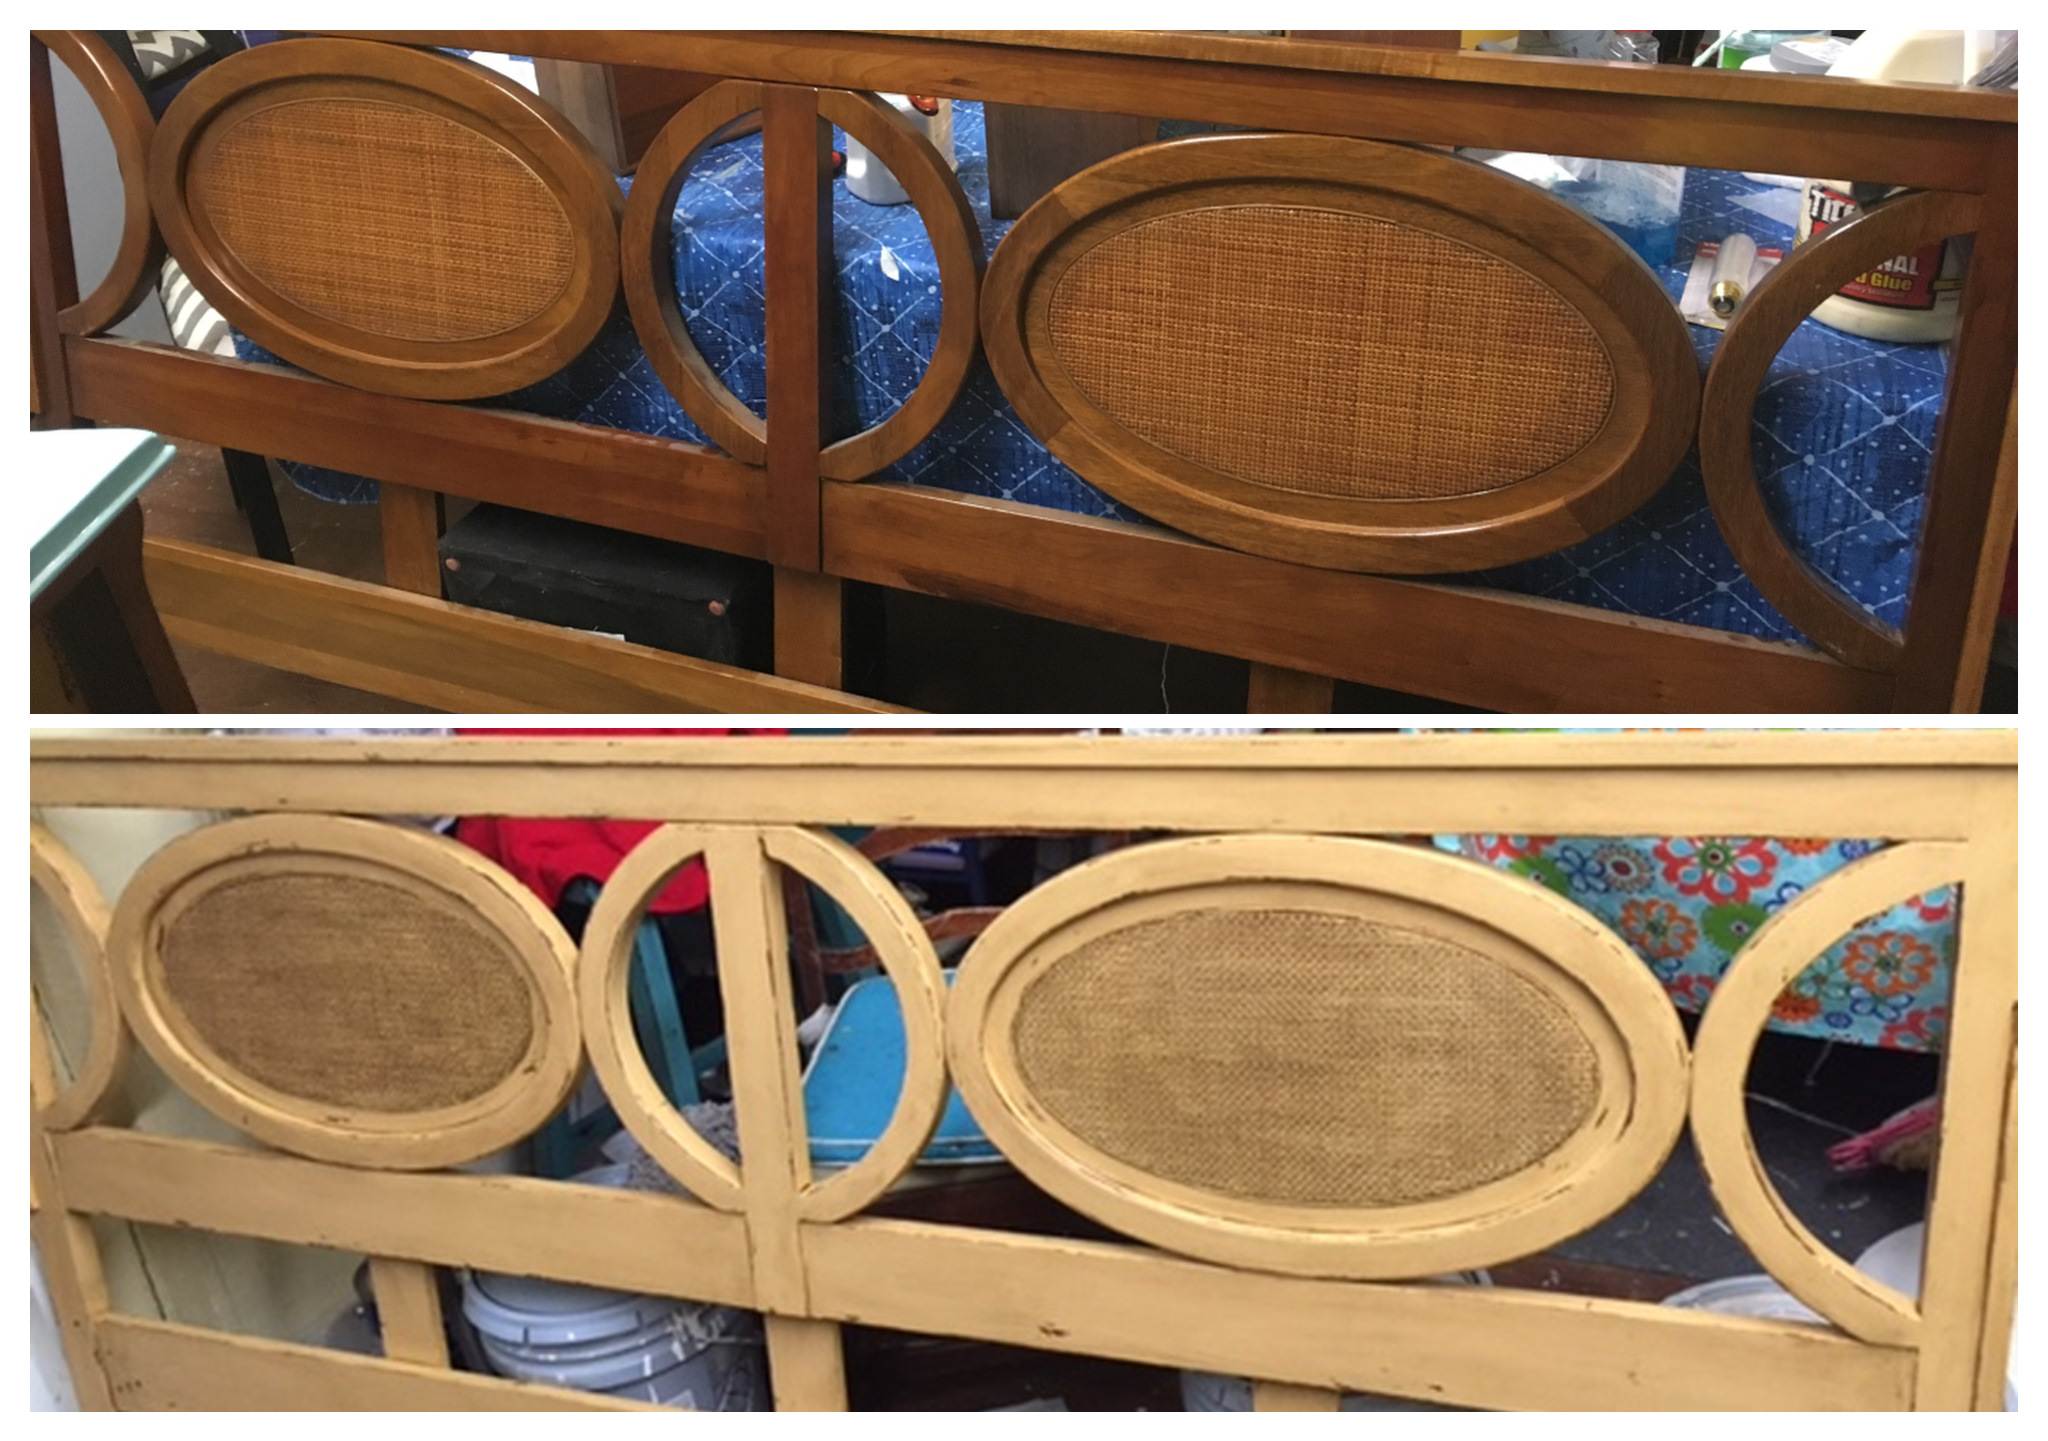
Another furniture piece was this headboard for another bedroom.  It is a very unique piece and had bamboo inserted in the center ovals. I painted both front and back with Sherwin Williams Viva Gold.  I sealed it with a clear and dark wax.

I was very relieved and happy when I finished all 6 pieces and they were picked up from my workshop, just in time for Thanksgiving.  They were able to set up their condo and enjoy it Thanksgiving weekend.  It is always a learning experience to do custom pieces and it was great to work with such high quality furniture.  It is rewarding to see the pieces in their new home and one day I plan to go see it in person.
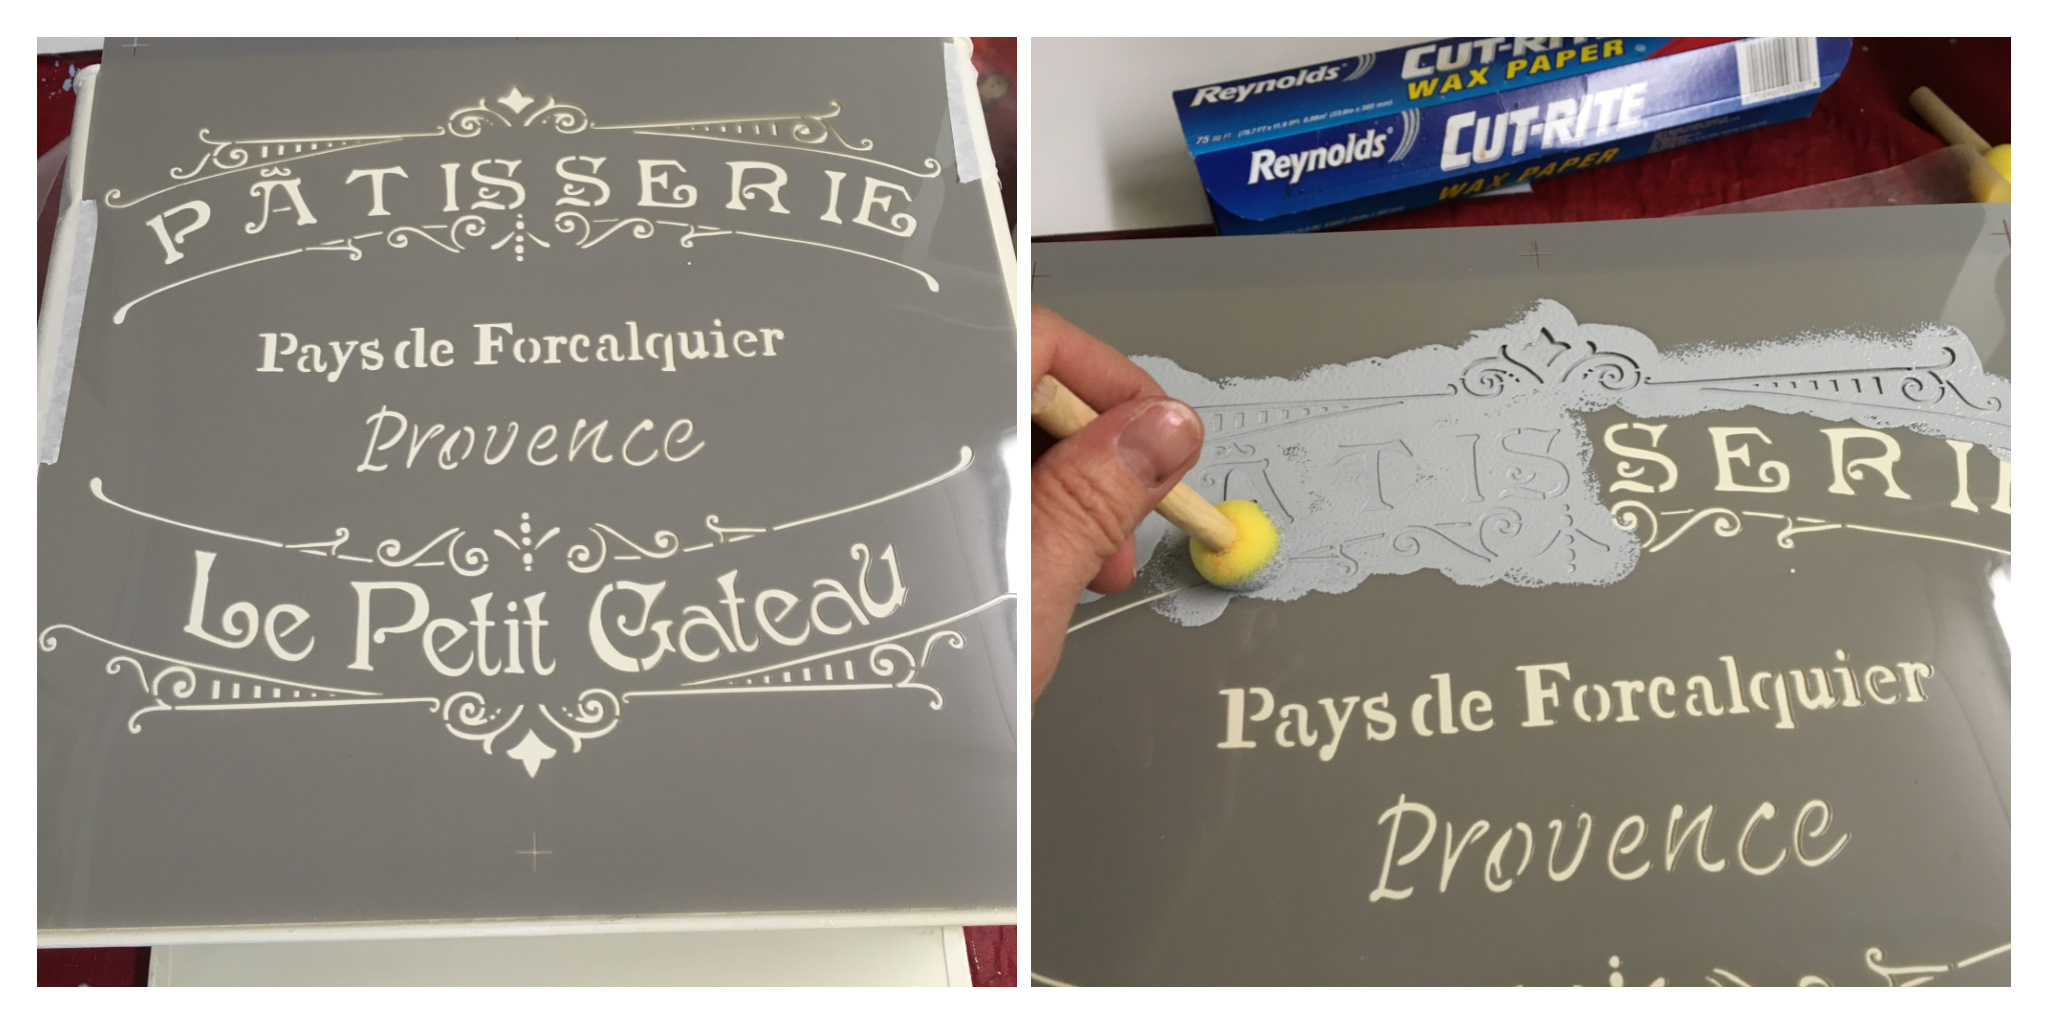
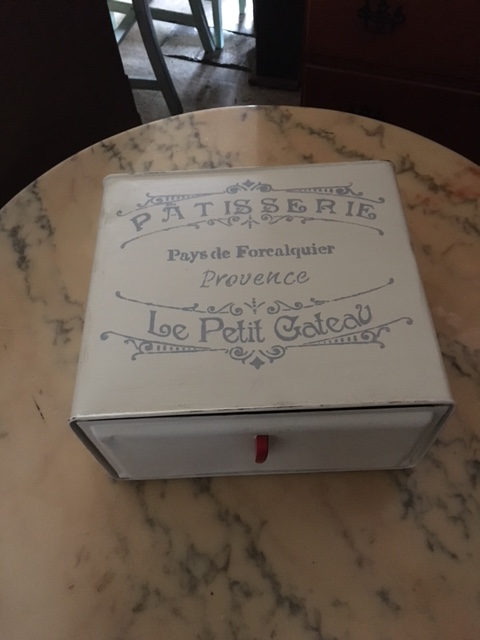


Advertisement

Refurbished Rocking Chair

img_3550This poor rocking chair needed some serious TLC.  I have a friend who sells me furniture and other items. She has been in charge of an estate in North Louisiana and also picks up projects for herself to work on here and there. Months ago she unloaded a trailer full of stuff  that she needed to get out of the way and didn’t have time to get to. She was trying to help her daughter who flooded also. I wasn’t there when she unloaded the stuff into my workshop otherwise this rocker probably wouldn’t have made it into my workshop.  My husband said I should throw away the rocker when I asked him if he would reinforce the seat.  He didn’t want to put the work into it. Well it sat in my workshop for about 5 months taking up space. I kept looking at it and I could see potential in it.  I knew  I couldn’t repair the ugly holes in the wicker part but I figured I could make cushions to cover the back and the seat.  When you sat in the rocker it was sturdy even though it doesn’t look like it in the picture. It has many layers of the wicker.

I  decided that I would redo this rocker for my oldest daughter to put on her porch when she gets to move back to her home that flooded.  She loves sitting outside and drinking her coffee. She lost her two rockers in the flood. One had been given to her as a house warming gift (one of those nice Cracker Barrell rockers) and the other one was given to us as a wedding gift 37 years ago. I had used it in my classroom for many years and gave it to her when I retired to rock her babies in.  She would appreciate the rocker even if it does have some issues.

img_3884img_3886 My 1st step was to put some wood glue on some of the areas where the wicker pieces were coming loose. I painted the rocker with 2 coats of Sherwin Williams Essex Green Exterior Duration Paint. (No chalk paint this time) I already had the paint from repainting the shutters on our rent house.  I knew it would be perfect for using on an outdoor rocker. As you can see the paint really made a difference not only to the looks of it but helped to make the wicker stronger.

Then I made 2 cushions for the rocker. The back piece was made from a piece of foam, covered with a piece of muslin type material that I stenciled a saying on. The seat cushion was made by covering an old cushion I had in my workshop. I made the straps to tie on the cushions to the top and the bottom. This was my first time to ever do that and I really enjoyed the sewing project.  I bought a huge roll of this fabric at the thrift store where I volunteer and it is perfect for making cushions and pillows and does well with the stenciling. I’m hoping it will be durable enough to last on an outdoor project.

The finished Project saved from the garbage dump! My daughter absolutely loves it and I can't wait to see her rocking in it on her porch when her house is repaired.

The finished Project saved from the garbage dump! My daughter absolutely loves it and I can’t wait to see her rocking in it on her porch when her house is repaired.


Collage table with remnants from “The Great Flood of 2016”

img_3636 My daughter’s house flooded in the “Great Flood of 2016”. When the trucks came to her house and lifted the pile of household debris there were some objects and fragments of things left on the ground.  She saved these items in a bag and told me she wanted some kind of memory table or box made to put these items in.  This year for Christmas I was able to make this project for her.  These fragments hold memories  and she can now have a safe way to keep and display them.

I found the end table at a Thrift store in New Orleans. It did have an edge on part of the top shelf but my husband took that off and made sides around the top and bottom shelf. I thought maybe she had enough objects to fill in both shelves but they ended up all fitting on the top shelf.

img_3380_collageimg_3562_collage-of-staining-and-painting

My 1st step was to stain the new wood that he added to it so that when I distressed it a pretty wood color would show through. Then I painted it Pewter Gray and distressed it.

img_3623_collage-of-putting-objects-onThis collage shows the process of putting down the objects on the top shelf. I hot glued the objects down to the table so they wouldn’t move around. Then I poured 1 quart of  Park’s Super Glaze on top. I waited 24 hours before pouring on another coat and really thought this would cover all the objects but it did not. The 1st coat went on smooth and didn’t have issues with bubbles. The 2nd coat did not do so well – it had a lot of imperfections and bubbles that showed up too late for me to do anything about it. But for this project it was okay. It looks like the objects are in a flood and it certainly was not pretty and smooth when all these objects went through the real flood.  I may end up putting a little more glaze on it.  (Warning – this stuff is expensive!)

final-collage-of-bottom-shelfThe next step was to do something special with the bottom shelf. I decided to decoupage pictures of her house during the flood, her debris pile and a Louisiana map. I stenciled the word STRONG across the map to show that we are Louisiana Strong.


img_3677_collage-of-christmas-day-giving-to-amy

On Christmas Day I surprised her and the grandkids with the table. It was very emotional for her as her and the kids started pointing to the objects and naming them. A lego, a paint set, paintbrushes, Mr. Potato Head glasses and a ear, a spool of thread, a piece of the tile floor, knobs from furniture, a spindle from a chair, video tapes of her 1st child’s birth are just a few of the things in the collage. One day she will be able to look back and see how some good things did come from this experience and she can still hold on to some of the memories from before the flood.

Antique Singer Sewing Machine

image2_collageMy sister and brother in law found this 100 year old sewing machine at a garage sale about 2 years ago and gave it to me to refinish.   I finally got around to giving it some TLC and some much needed sprucing up.   I just love the old pedal sewing machines and I can’t help but think of how exciting it was back then to use one of these for the 1st time.  This one still had a lot of the parts, bobbins, etc. in the drawers and the pedal on the base still works fine but unfortunately the leather treadle belt is not attached anymore. I did not refurbish the sewing machine other than to clean it with some polishing cream.  I just wanted to make it presentable where it could be used as a table.

IMG_0787_collage My first step was to work on the 4 drawers. I decided to paint them a light teal color, distress them , and then seal them with a coat of clear wax and then dark wax.  The dark wax toned down the bright color and made it look more natural for an old piece of furniture.  When I placed them back in the cabinet I saw how the original wood looked great next to the drawers so I decided to not paint that area.  I knew from the beginning that I needed to salvage as much as I could of the original piece.  As you can see in the 1st pictures the veneer was missing on most of the top so that part had to be painted.

The cleaning of the machine with the polishing cream.

The cleaning of the machine with the polishing cream.

IMG_0852


IMG_0856_collageI kept the part that folds out to display the sewing machine with the original finish. I refreshed it by staining it with Minwax polyshade.


IMG_0862_collageIMG_0871_collageThere were some places where I had to scrape and sand the veneer to make it smoother. I was not able to get off all of the veneer but I knew it was going to be painted and distressed  so I figured it wouldn’t matter.  I painted the top surfaces just like I did the drawers,  sanded, and then clear and dark waxed.

My favorite part was clear waxing on the original wood on the holding areas for the drawers and inside the drawers. It really made a change in the wood and was exciting to see it come to life.


IMG_0895IMG_0901

Here is the finished project. It is now in my shop and I am putting some of my sewing related items for sale displayed on it. The sewing machine is priced at $120.  Update: This sold after being in the shop for only a week.


Red Rooster Chair

IMG_4478One of my latest projects is this Red Rooster Chair.  Before the makeover this chair was very plain and not very attractive and I came close to giving up on it.  My husband had to work really hard to get it reinforced and sturdy again.

IMG_0765_collageI took off the seat cushion and the next step was to go through my upholstery material to see which one would go with this chair.  As soon as I put the rooster material up to it I knew this had to be it.  I had just the exact amount needed leftover from a project I did years ago and I have always loved this material.  I sanded it some and then painted it Sherwin Williams Intellectual gray made into chalk paint and put on a clear wax. The next day when I set the cushion on top to see what it would look like I really liked the gray but I decided to go forth with my original plan of painting red on top of the gray to give it a two tone effect.  I painted a thin coat of Sherwin Williams Antique Red made into chalk paint and sanded in some places right away because I wanted it to be heavily distressed. The wax I did the day before also helped the effect of it looking very distressed without having to do a lot of sanding.


IMG_0776_collageIMG_0782_collageI clear waxed the chair, let it seep into the wood for a day and then dark waxed it the next day. You can see on the close-up picture of the back slats of the chair the difference it made with the dark wax. The 1st two slats have the dark wax.  I love doing simple projects like this and seeing the results right away.  Sometimes people come into the shop just wanting a single chair for a kitchen area or a desk.  This one is available at “Ginger’s Attic” for $48.

This shows the before and after of the chair.

This shows the before and after of the chair.


Glitter Projects for Photo Shoot

This week I got to play with lots of glitter doing some projects for my daughter’s photo shoot. She is doing a “Smash Cake” type session for someone celebrating their 30th birthday. Being a former Kindergarten teacher I’ve had a lot of experience with glitter but I just found out an easier way to do this without the messy glue. (Thanks to Pinterest) For these projects I sprayed on the Mod Podge clear acrylic sealer and then sprinkled the glitter. I did it in small sections because with the heat the spray doesn’t stay wet for long. One thing I learned after struggling with taking the labels off of the wine bottle was that I could have just left the labels on and glittered right over them and it would have covered it well enough.  On all the projects I sprayed a layer of the mod podge sealer on top to help keep the glitter on but I will say they still shed glitter a good bit when handled. I can’t wait to see how the pictures come out after tonight’s photo shoot. Here is a picture of how she set it up for the photo shoot.IMG_0493IMG_0490

Vintage Bread Box

image2I found an old vintage bread box that was all rusty and wanted to refurbish it and make it usable again.  I first cleaned it up and took the hardware off.  Then I painted it with Sherwin Williams white latex paint (duration) to give it a durable and washable service.  I purchased months ago a really nice stencil that says “The French Bakery” in French.  I was so excited to finally get a chance to use the stencil.

image1_collageIMG_0278_collage

Here is the bread box finished and in “Ginger’s Attic”.  It is nice, clean, and refurbished, ready to go in someone’s home and could be used for it’s original purpose – to store bread products in.  It even has a small vented area in the back of it.IMG_0282

IMG_0310

Metal Wall Décor – Painted, Distressed & Antiqued

IMG_6974IMG_6979_collageMy husband and I found this nice metal wall hanging at an estate sale. I have been looking for something to put on my kitchen wall ever since we repainted it.  I love the designs on it but it was in need of some TLC. It was rusting and pieces were flaking off both on the front and back.  First I  scraped off all the areas that had loose pieces and sanded it lightly.  Then I painted it Sherwin Williams Empire Gold – made into chalk paint.  This is the same color as my dining room which is close to where I will have this in my house.  I only had to paint one coat because I really wanted the original black to show from underneath. Then I distressed it which is very easy to do on metal pieces. Then I put on clear wax, let it dry and then antiqued it with dark wax.  This was one of the easiest projects I have done in a long time.

Here it is hanging In my kitchen over the pantry door. I love it!

Here it is hanging In my kitchen over the pantry door. I love it!


Vintage wall divider panels refurbished for the men’s bathroom in Country Kitchen

We have been remodeling at the Country Kitchen and now have 2 men’s bathrooms. I worked on some old vintage room dividers that have been in the restaurant since it’s beginning 30 years ago to use for privacy panels in one of the bathrooms. The bathrooms have beautiful new tile walls and floors and didn’t look very vintage so I wasn’t sure if it was going to work. I painted a two tone effect of two shades of gray to match the tiles and I varnished with a heavy duty varnish.  I think they came out really nice and I was so happy to be able to use something we already had laying around the restaurant – especially after the expenses of doing this nice renovation.

IMG_7231_collage better oneFullSizeRenderIMG_7232_collage

Bench made from twin bed frame

IMG_6591_collageHere is another bench made from a twin bed. The foot board was cut in half and used as the sides. The headboard is used for the back.  This frame didn’t have any rails with it but was in very good shape and very sturdy.  The only part that had some damage was 2 small areas around the knobs which I fixed with some wood putty.  I also had to cover the metal screws with wood putty.  Usually we redo old pieces of furniture; this was probably the newest piece we have done.

IMG_6417_collage

This shows the building of the bench.

IMG_6470_collageI purchased material for pillows and a cushion and then picked the paint colors.  My sister offered to do the sewing. I first painted the bench with white primer. Then I painted it Halcyon green (Sherwin Williams) same color as Annie Sloan’s Duck Egg Blue. I make my own chalk paint with the Sherwin Williams paint.  I put on clear wax (Cee Cee Caldwells) in some of the areas that I knew I would be distressing. Then the next day I painted the next coat -Caen Stone (Sherwin Williams).  My next step was to sand lightly to let the blue color show through. I didn’t want the white primer to come through too much.

IMG_6560_collageI then put a coat of clear wax and waited a day and then put Annie Sloan dark wax mixed in with some of the clear wax.  It really needed the dark wax.  When you have two completely different colors it is too much contrast and the dark wax makes it all come together.  The dark wax does have to be wiped off with cheesecloth or a lint free cloth. Both waxes act as a sealer so you do not need to put any varnish unless you are going to place it outside.

This is the bench in my shop with the pillows. The cushion will be ready soon.

This is the bench in my shop with the pillows. The cushion will be ready soon. I love the bird fabric on the pillows and it really brings out the blue color in the bench.  Thanks to my husband and sister for their help with this project.

IMG_6897

Here it is with the cushion. It is for sale for $300.